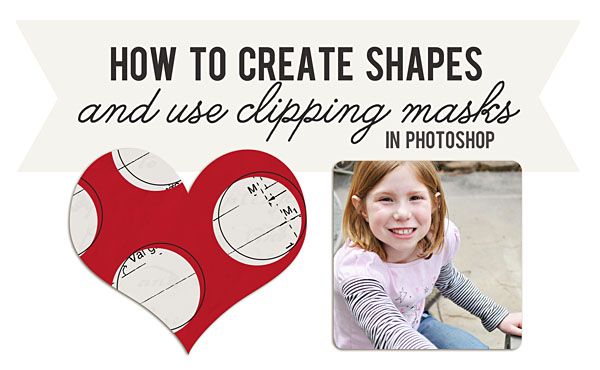
Tutorial | Creating Shapes and Using Clipping Masks
Posted on under Scrapbooking Tutorials, TUTORIALS
Have you ever had an “aha” moment (as Oprah calls them) – but in digital scrapbooking? I think we’ve all had a few of these moments as we begin to learn our digi-scrap programs and read and glean from tutorials. Today I want to break from our photo editing tutorials and do something a little different just for a change of pace. I thought I’d start with a digi-scrapping tutorial on: How to Create Shapes in Photoshop, AND Using Clipping Masks to Clip Papers and Photos. For those that are newer to digital scrapbooking, this is a great way to learn a new trick. And for those seasoned scrappers, it might give you some ideas on how to branch out with the skills you already have.
[pinit]
For this tutorial, I will be using Photoshop CS5. We will first learn 1) How to Create Shapes, and after that, 2) I’ll give ideas on how to use those shapes as clipping masks. Start by beginning with your page. You can start with a a new 12×12 document or start with your background paper.
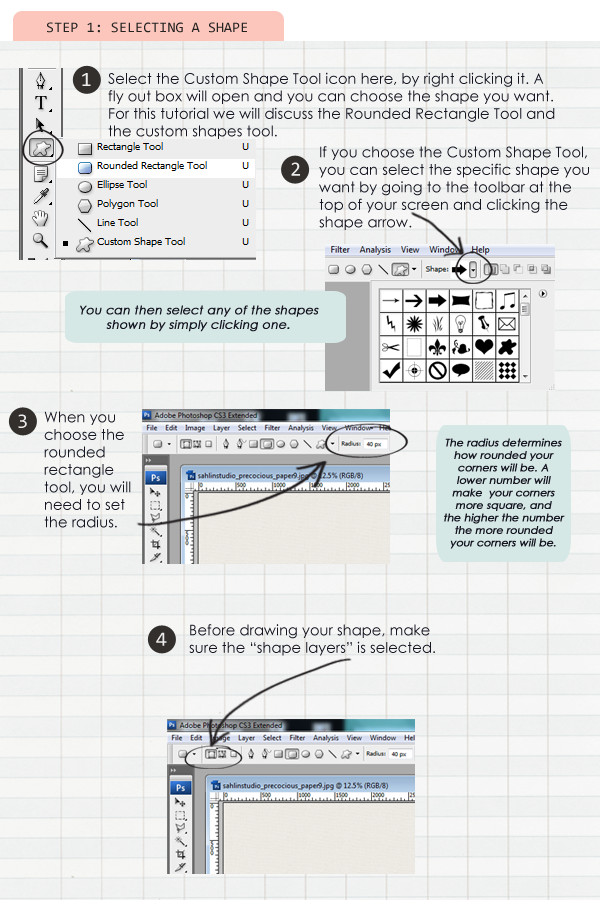
SELECTING A SHAPE:
Step One:
1. Select the Custom Shape Tool
2. If selecting Custom Shape: Choose the Shape you wish to use
3. If selecting Rounded Rectangle tool: Set the Radius
4. Make sure Shape Layers tab is selected.
![]()
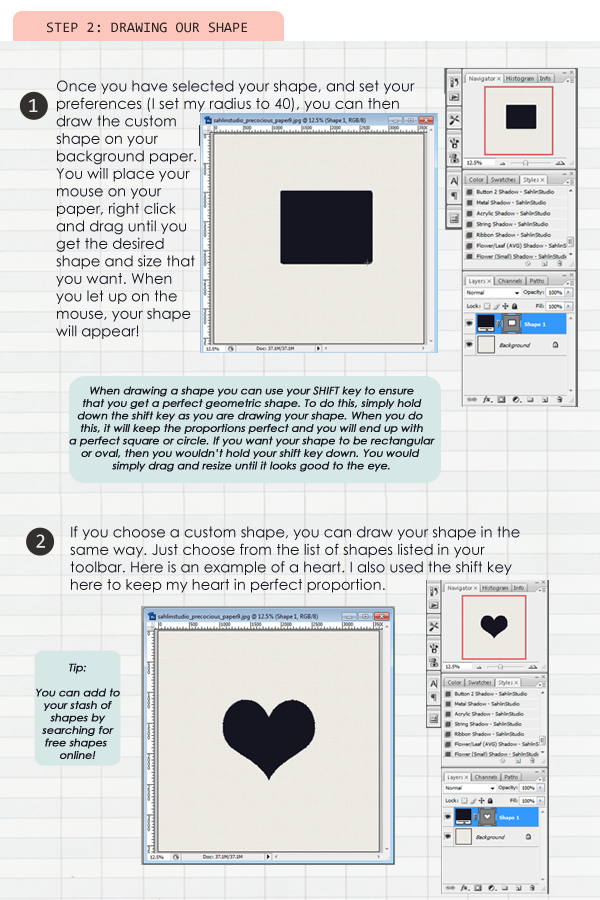
DRAWING OUR SHAPE:
Step Two:
1. After your shape is selected:
2. Right click on your canvas and Pull Down until you reach the desired size.
**TIP*** If you want your shape to maintain perfect proportion (same width and height),
be sure to hold the shift key down as you drag.
![]()
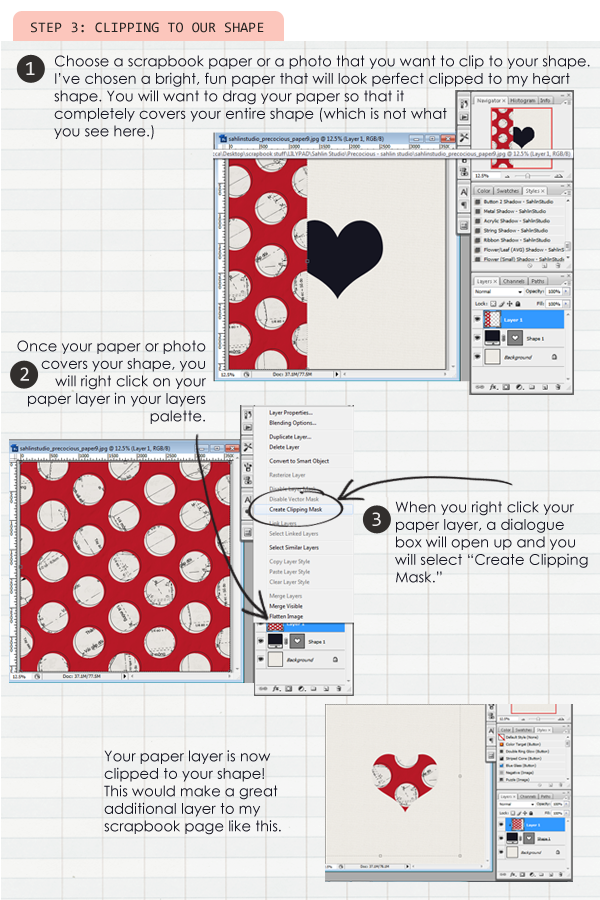
USING OUR SHAPES AS CLIPPING MASKS:
Now you might wonder what exactly can we do with these black shapes that we have just drawn. This is where “clipping” comes in… and the possibilities endless! We can take ANY of these shapes and clip items to them. We can clip papers, photos… there are so many ways you can use a Clipping Mask. By using the Shapes Tool, you can even build your own template to make your layout. This is exactly my scrapbooking process… Let me explain how.
Step Three:
1.Drag a paper or photo layer on top of your shape layer, making sure it completely covers the shape.
2. Right click your paper layer in your layers palette
3. Select Create Clipping Mask
![]()
What to Do After You’ve Clipped:
There really are so many things that you can do with the shapes and clipping tools.
And I hope after reading this, many of you have had an “Ah HAH” moment today!

April 10, 2012 at 7:04 pm
Marlene Lehman says:
Thank you so much for this excellent tutorial.
April 11, 2012 at 8:17 pm
Nancy says:
Thank you for the tutorial. It is great to see something new to do as far as the tuts go. Sometimes they are always the same!
I like your ideas.
May 8, 2012 at 10:56 am
Tutorial | How to Align and Distribute | Sahlin Studio | Digital Scrapbooking Designs says:
[…] One: Start by Creating Shapes 1. Using our previous tutorial on making shapes, create three boxes that are of equal shape. (The simplest way to do this is to create one shape […]
June 20, 2013 at 4:40 am
Mostafizur says:
Awesome tutorial.Thanks for sharing.
November 4, 2014 at 7:06 pm
Joolo says:
nice step by step tutorial. good post
December 26, 2015 at 11:51 am
shawon says:
Realy good tutorial..it helps us to make photo mask..thanks for share.
June 2, 2012 at 9:59 am
Shamim says:
An excellent tutorial, very clear and a fantastic outcome, thank you very much.
June 30, 2012 at 1:47 pm
Gina says:
Thank you for posting this. It helped me so much!!
Blessings to you!
July 19, 2012 at 7:13 pm
Shamim says:
Some of these tutorials are extremely good, magazine like. Thanks for sharing!
October 12, 2012 at 2:22 pm
Scrapbook Page Designs Using Three Photos | Sahlin Studio | Digital Scrapbooking Designs says:
[…] and “clip” your photos to the design. Not know how to do this? See this tutorial here. kristasahlin NicoleLeBlanc sucali rebecca h kaydee sahlink ashleywb Lor mrsski07 rebecca h breeoxd […]
November 19, 2012 at 9:38 am
The Beginner’s Guide to Digital Scrapbooking: Supplies and Basics | Two More Days says:
[…] masks to clip papers to the shapes in the template. Sahlin Studio has a great tutorial on using clipping masks in Photoshop and Paislee Press has a tutorial that will take you step-by-step through using a layered […]
November 26, 2012 at 9:24 am
Beginner’s Guide to Digital Scrapbooking: Making a Layout Step by Step | Two More Days says:
[…] + Opt/Alt + G) to clip it to the green block. (If you’re unfamilar with clipping masks, this tutorial by Krista Sahlin is a great introduction to them.) Now we’ll start to decide what papers and elements […]
December 3, 2012 at 7:54 am
Monday News ~ 12.03.12 « Digital Design says:
[…] of the questions Friday was how to put pictures inside a heart shape. Check out the tutorial at http://sahlinstudio.com/tutorial-creating-shapes-and-using-clipping-masks/ to learn how to create a clipping mask. Keep in mind if you have multiple layers of photos that […]
January 31, 2013 at 9:13 am
Dubai website design says:
In this tutorial you are masking image on share, but any one tell me how can I mask or reshape with other shape, or how can I use solid icons with shapes no color, no shades only solid icon in photoshop. Please share link for guidance is any body knows.
Thanks.
February 20, 2013 at 1:18 am
Amber says:
You’re the bomb! I knew much of this over years of using Photoshop but you just laid all this out so perfectly and was such a nice refresher. Your steps are put together so clear and comsise. Thank you!
March 3, 2013 at 4:39 pm
Photoshop Class 3 | RAE - Research and Exploration says:
[…] Here is a link to a Clipping Mask tutorial on SalinStudio.com […]
June 13, 2013 at 8:11 am
Federico V says:
This is a very decent tutorial! Easy to follow, with lots of images to clarify, great work!
July 31, 2013 at 7:27 am
Shelly says:
Awesome Tutorial, Thank you for sharing!
August 11, 2013 at 8:23 pm
Photoshop + PDF Class 3 | RAE - Research and Exploration says:
[…] Here is a link to a Clipping Mask tutorial on SalinStudio.com […]
September 12, 2013 at 6:56 pm
Faith says:
Thank you! Was trying to figure out how to use a shape layer to highlight areas of a picture. This was just what I needed!
January 25, 2014 at 5:01 pm
Leah says:
Great tutorial! Would you be able to tell me how I would make a border around the edge of the heart?
July 27, 2014 at 9:15 am
How To Create A Spiffy Swipe Effect in Photoshop! | GameDevCollege says:
[…] On the images, I applied a background before stacking and clipping (read more about the clip mask here) to the background of the frame. I did this so the image below will be completely hidden. This […]
December 1, 2014 at 12:32 am
Bijutoha says:
Excellent Idea. It is going to lead me a new way to keep Clipping Mask. Thanks for Sharing…
June 22, 2015 at 11:48 pm
Digital Scrapbooking Tutorial: How to clip a layer in Photoshop says:
[…] Sahlin Studio also has a wonderful tutorial. […]
August 7, 2015 at 2:19 am
Vanessa says:
Many thanks for sharing step by step tutorial, I need it now. I always feed hustle in removing a single layer from clipping mask.
August 28, 2015 at 1:43 pm
Krista says:
So glad this tip helped you!! Have fun!!
December 26, 2015 at 11:52 am
shawon says:
Realy nice teutorial…
February 19, 2016 at 9:06 am
Brenda says:
Do you have a way of creating clipping mask with layered PSD template in Pixelmator app for iPhone. It claims to be able to thanks
August 30, 2016 at 1:05 pm
Creative Designs Using Shapes – nagaworld.info says:
[…] Tutorial | Creating Shapes and Using … – For this tutorial, I will be using Photoshop CS5. We will first learn 1) How to Create Shapes, and after that, 2) I’ll give ideas on how to use those shapes as … […]
January 21, 2017 at 12:43 pm
Rahim mia says:
Thanks for your good clipping mask tutorial and help our business
October 16, 2017 at 4:07 am
Erika Pieu says:
Wow Excellent and helpful tutorial. hope you will share more tutorials.
June 28, 2018 at 3:28 am
Mike Pitter says:
Many many thanks for sharing with us the tutorial about how to create shapes and using clipping masks.