Easy Ways to Track your Credits
Posted on under Getting Started in Digital Scrapbooking, TUTORIALS
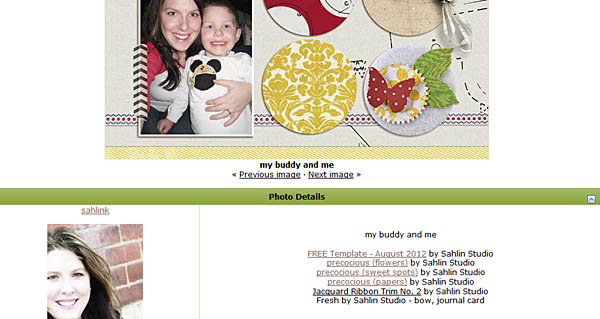
If you’ve been following the blog lately, then you know how to save your layouts for the web, and how to upload a layout and properly link your credits in an online gallery. Now we’re ready to talk about how to keep track of those credits. (Remember that “credits” are simply a list of what products you used on a particular layout.)
It’s important to give credit where credit is due when you are posting a page created with someone else’s designs online. But, unless you are strictly a single kit scrapper, it can get confusing to remember which stitch came from which kit, and whether that frame belongs to Designer A or Designer B.
Methods of tracking your credits vary from scrapper to scrapper. You might prefer the ease of keeping a notepad by your computer, and jotting down what you use. This method can be a bit time-consuming, though, and frustrating if that notepad walks off (or is carried off in little hands, as is likely to happen in my house!). Plus, as digital scrappers, we often lean towards the more technological solutions, and I have a few options to share with you.
Easy Ways to Track Your Digital Scrapbooking Product Credits
Example of a Layout with Credits:


Method 1: The Notepad
the Paper Notepad
This one is pretty self-explanatory. Keep a physical notepad by your computer, and write down every product you use. When it’s time to post your layout, you’ll need to type the credits into the description field, and add your links at that point if needed.
the Digital Notepad
You can also use a digital “notepad,” such as Evernote or your operating system’s built-in Notepad. I like to use a little Windows 7 program called Sticky Notes to type up my list of credits, and then I can copy and paste from there.
Photoshop’s “File Info”
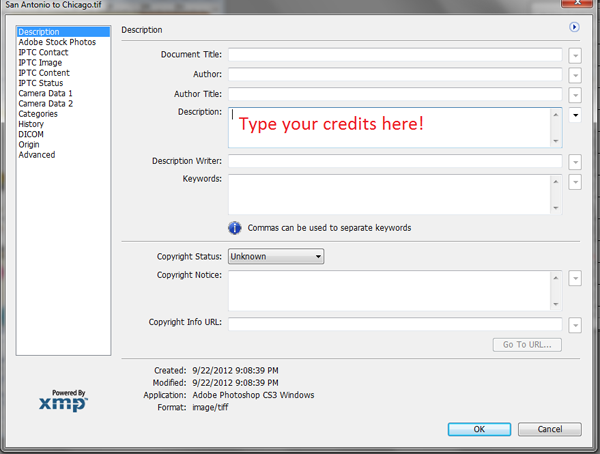
Perhaps the best “notepad method” is to use the File Info feature built right into Photoshop. Whatever information you type into the File Info will be saved to the file’s metadata, which means it will always stay with the file, eliminating the need for an additional bit of (real or digital) paper. You can access this handy feature by going to File > File Info. Type your credit list into the Description field.
Although this method appeals to my simplicity-loving side, copying all the links, typing up the BB Code, and formatting everything correctly steals away valuable scrapping time. Keep reading to learn about two other, time-saving methods I tried out for tracking credits!

Method 2: A Firefox Extension – Copy Link Text
If you already use Firefox as your browser, you’re halfway to easier credit tracking. I found this method very easy to understand, quick, and simple to use. I would recommend this for the beginning to intermediate-level scrapper who needs something more than a notepad, but maybe you don’t need to track or link your credits for every layout.
1. Install the Firefox extension Copy Link Text (or CoLT).
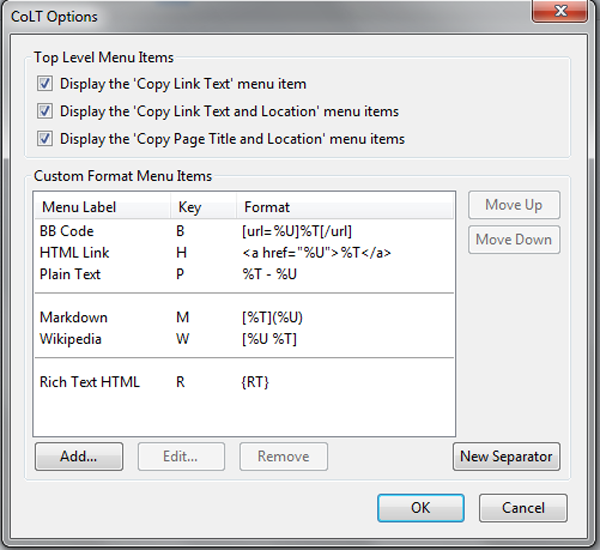
2. Set up the CoLT Options by going to the Firefox Tools drop-down menu, choosing Add-ons, then Extensions. Find CoLT in the list, and click Options. The only option I changed was to select BB Code and move it to the top of the list. Then click OK.
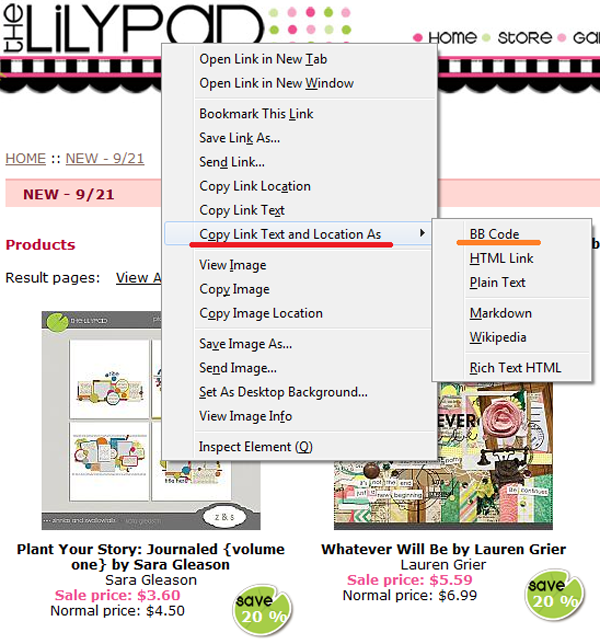
3. To use it, go to the store and find the product you want to credit. This saves so much time, especially if you have a long credit list. Simply right-click on the image of the product, and you’ll see some new options in the fly-out menu. Choose Copy Link Text and Location As> BB Code.
This will copy the information to your Clipboard, and all that’s left is for you to paste it directly into your gallery description. Or, if you aren’t ready to post the layout yet, stick it into a Word document, Sticky Note, File Info, or wherever else you want to save your credit info until time to post.
You’ll get a perfectly formatted bit of BB Code, like this line:
[url=http://www.the-lilypad.com/store/product.php?productid=8749]tabbed folders by sahlin studio[/url]
In the gallery description, it will look like this:
tabbed folders by sahlin studio
4. Rinse and repeat for all your credits!

Method 3: Anna Forrest’s Credit Tracker Script
Are you a prolific scrapper? On a bunch of creative teams? Spend way too much time typing out the same information? This option is for you. If you’ve never used a script before, you’re in for a treat. After some initial installation and set-up, Anna Forrest’s Credit Tracker Script does all the work for you. The best part? The longer you use it, the more time you’ll save! It can seem intimidating to get started, though, so I’m going to walk through it step-by-step.
1. Purchase the correct version. Anna offers versions for PSE, PS3+, and a bundle with an add-on panel for CS4 and CS5. This tutorial is written using Photoshop CS3. Follow Anna’s detailed user guide to install. She goes into great detail, so I won’t try to replicate everything here!
2. Configure the script. Create a new 12×12 document first (or whatever size layout you want). Then go to File > Scripts > AFD Credit Tracker – Configure. Make sure Enable credit tracking is checked, then click Add to choose which folders to “watch” – this means that whenever you bring in something from a watched folder, the script will add that kit/element pack/etc to your credit list. I chose both my Downloads folder and my Scrapbooking Supplies folder. It will automatically include all sub-folders.
If you want newly opened items to be automatically placed on your layout (and then closed), check the Remember target document box, and select your layout document. This is entirely up to you and how you scrap. Click OK.
3. Scrap away! Every time you open an item from a new kit/folder, the script will pop up a little form asking you for that kit’s information. The script works by creating metadata, stored as a .crd file in the kit folder. You will only need to input information for a particular kit once. It works best if you keep everything from one kit in a single folder (rather than, for example, splitting up papers, elements, and alphas). Every time you use anything from that kit/folder in the future, the info will be automatically pulled from the metadata file.
In my screenshot, I opened a word bit from Snipettes: Travel by Sahlin Studio. Since it was the first time I have ever used this kit, the metadata form popped up.
![]()
You can include as much or as little information as you want. Since as a CT member I need to post links to the kits I use, I went ahead and fetched the kit link from the store. Remember – you will never have to re-type this information again!
4. Generate your credit list when you are done scrapping (before saving and closing your layout). Go to File > Scripts > AFD Credit Tracker – View Credits. Double check that everything is correct as shown in Credits Summary. Check the boxes for Show store name and Show product links, if desired. Select Output format: BB Code, and Save to: Document’s File Info (or other location if you prefer).
![]()
Click OK, and then Close after you get the “credits generated successfully” message. Now go to File>File Info. You should get a screen similar to the picture below. In the Description field, you’ll find your credits list fully formatted and ready to copy and paste into the gallery!
I hope you learned something new today, I know I sure did while writing this post! There’s no wrong way to track your credits, and different methods work better for different people. What’s your favorite way to give credit where credit is due? Any tips or tricks you’ve learned to make it quicker and easier?


October 13, 2012 at 11:23 am
Cyranoscrap says:
Wow, Krista – I had NO idea there were so many ways to save the Credits info! I’ve just used the Notepad on my laptop to at least capture the name of the kit and designer. Sometimes, it’s hard to remember what store I bought it from since designers move around.
Thanks for the helpful tips! 🙂
November 29, 2012 at 12:19 pm
Ashley says:
I just tried to find Anna’s Credit Tracker and it seems like the store no longer carries her products. 🙁
Any other credit trackers out there?
December 3, 2012 at 1:49 pm
Krista says:
I just heard that she retired. Bummer. I haven’t heard of another tracker, but do try the Firefox plugin.. it works great!!
July 22, 2013 at 3:40 am
kyky says:
Thanks for this post! I will try the Anna Forrest script..I saw her etsy store 🙂 let’s hope she sells the script there! thanks!!
July 26, 2013 at 1:42 pm
Bozena says:
I use PSE 6 and the easiest way to keep track for me is by using : File>Place>find the element or paper>Place. This will name each layer the way you have them filed in your folders. It’s very helpful to save your project as PSD file besides the JPEG file until you are done with posting all of you credits. I hope this explanation will make the process much easier for you too.
January 4, 2014 at 9:57 am
Anna Forrest says:
For those looking for my credit tracker script: you’ll now find them on Etsy! Here: https://www.etsy.com/shop/AnnaForrestDesigns
January 5, 2014 at 10:02 am
Krista says:
OH YAY!! Soi glad to find out they are still available. Thanks Anna!
January 5, 2014 at 2:03 pm
Mary Kay says:
I use PSE and recently added ACDSee15. It’s SO easy to track credits in ACDSee (though it doesn’t do that nifty link thing– I’ll have to check that out). You pull anything you use into the Image Basket (if I’m looking for options for, say, a yellow paper, I’ll pull a bunch of them into Image Basket and then delete the ones I didn’t use). When you’re done, you hit CTRL+G and it generates a Notepad doc with all the file info for each element. As long as they’re named by designer, you’re golden. Then I copy/paste into File Info.
I got this and tons of other helpful organization info from http://www.kaylalamoreaux.com/ Unfortunately, she’s taken down the blog for now and is promising an overhaul.
February 20, 2016 at 3:37 pm
Mylinn says:
Thanks so much for this – even at this late date, it is still most useful!