Tutorial | How to Lighten and Brighten Your Photos
Posted on under Photo Editing Tutorials, TUTORIALS
Over the next couple of months I will be featuring a series of tutorials on photo editing. Hopefully you will learn how to make your ordinary photos look extra-ordinary using a few simple steps! Today we will begin with one of the most basic techniques – Lighten and Brighten Your Photo. I will be using Photoshop CS5 for my tutorials, but this technique should be similar for Adobe Elements users.
![]()
Original Photo SOOC (straight out of camera)
It isn’t too bad in its original state. But it can definitely use some brightening up!

Here are some quick tips to give your photos a quick, simple brighten:
First we begin by duplicating the layer. That way, when we make adjustments, it will adjust the duplicate layers and the bottom layer will remain the original photograph you began with.
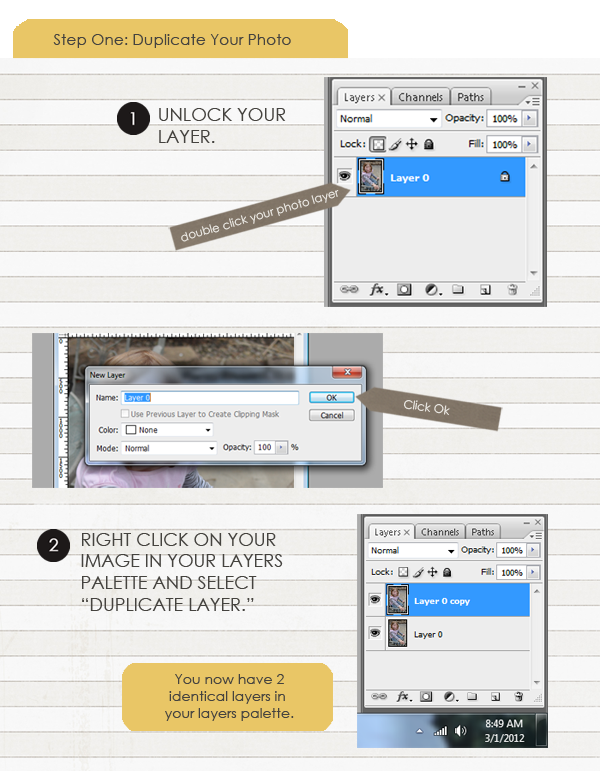
Step One: Duplicate Your Photo
1. Unlock your original photo, by double clicking Layer 0.
2. Duplicate your original photo, by right clicking and selecting, Duplicate Layer.
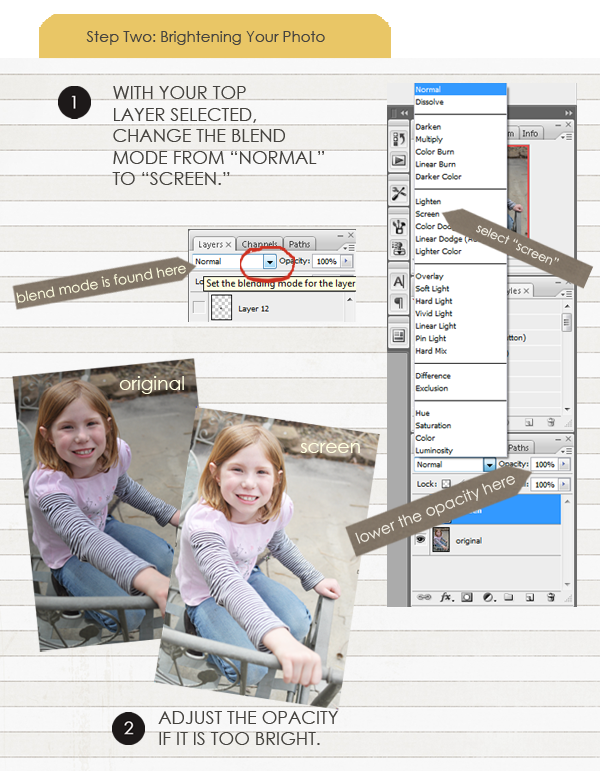
Step Two: Lightening Your Photo
1. Select the Duplicate Layer (on the top) and change Blend Modes from “Normal” to “Screen”.
2. If your image is too bright, adjust your Opacity Slider down to taste.
WOW!! Doesn’t that one step make a huge difference??
Now the photo is lightened, but now it lacks a little contrast in color.
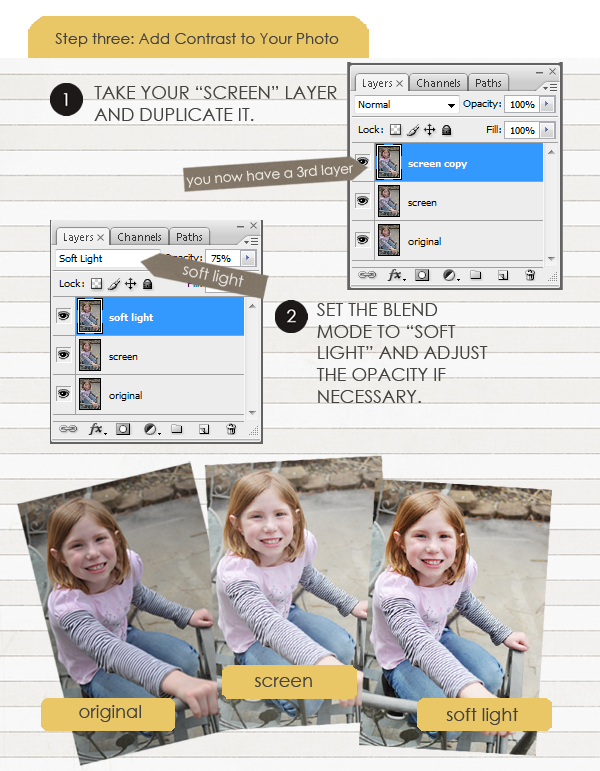
Step Three: Add Contrast to POP
1. Select the “Screen: Layer (on the top) and change Blend Modes from “Screen” to “SoftLight”.
2. Adjust your Opacity Slider down to taste.
The opacity of the layers will be different depending on your photo. Just have fun, play around and tweak each photo until it looks best. (On this particular photo I used 75% Opacity on the Screen layer, and 30% Opacity on the Soft Light layer)
Before and After
Three simple steps made an incredible difference in this photo…

When you are happy with your final picture, don’t forget to save so you don’t lose your changes. Select “save as” and jpeg as your format. I like to name my file slightly different, so my original photo still stays intact. For example, this is how I would save as: IMG8015-lighten.
I hope this has been a help to you! Be sure to check back soon for another photo editing tutorial.

March 8, 2012 at 1:13 pm
Chris says:
Thanks for the awesome tips, I’ve only been using lighten showdow & it’s sometime too harsh, can’t wait to try this!!
March 8, 2012 at 1:17 pm
Moi says:
Thanks so much.This is so helpful.You are the best:) 🙂
March 8, 2012 at 2:06 pm
Corinna says:
Thank you so very much for this great and effective tutorial. I am a PSE beginner and happy to find easy tutorials to follow and learn thereby.
March 8, 2012 at 9:14 pm
Cynthia says:
Awesome tutorial, thank you.
March 8, 2012 at 11:54 pm
Tetet says:
This is so easy and useful! Thanks a bunch!
March 9, 2012 at 10:13 am
Vicky says:
Thank you so much for this helpful tip.It’s a piece of cake.I would always lighten my photos the wrong way and end up with greenish or reddish ones.You’re the best!
March 10, 2012 at 11:03 am
Vera says:
Wow. I love the simplicity of this method! Thank you so much for sharing 🙂
March 11, 2012 at 5:22 pm
Gayle says:
This was simply amazing! I made it into a Photoshop action and I’ve already gone back and fixed some of my photos and redone some layouts. They look sooooo much better! Thanks so very much! 🙂
March 12, 2012 at 10:26 am
Krista says:
Doesn’t this technique make a HUGE difference? Great job on turning this into a time-saving step. I was thinking of making this an action as well!
March 14, 2012 at 11:07 am
aimee says:
This is a very very nice tip and easy to remember. I tried it and i will definitely use this! thanks!
March 15, 2012 at 12:20 pm
Tutorial | Defog Your Digital Photos | Sahlin Studio | Digital Scrapbooking Designs says:
[…] week we learned how to “How to Lighten & Brighten Photos“. We will be using the same photo from the previous post. So you can see as we go through […]
April 1, 2012 at 1:26 pm
Tutorial | Color Correcting Your Photos with Curves | Sahlin Studio | Digital Scrapbooking Designs says:
[…] sure you check out the last two photo editing techniques we’ve learned in previous tutorials: lightening and defogging. The next step in our photo editing process is: Color Correcting Your […]
August 10, 2012 at 10:24 am
Leticia says:
OMG! Such a difference. I´ve just try this with a pic of my daugther, and was like magic! Thank you so much for the tip
August 13, 2012 at 9:18 am
Krista says:
Isn’t this a miracle tip?? I use it on almost EVERY photo! Glad this helped you.
May 2, 2013 at 12:41 pm
rachael says:
What a lifesaver – I am always messing around with curves and levels, thinking I would achieve this effect, and NOPE! So thank you!!
July 31, 2013 at 10:56 am
Paige says:
This was an amzing tutorial! Sometimes I find them hard to follow and they are often all over the place, but your arrows, descriptions and images really helped! My images look great!
Thank you so much:)
March 21, 2014 at 5:20 pm
Ivana says:
Thank you so much for this tutorial!! I only use Corel Paintshop but the steps the same anyway, I really needed to know this because by blog pictures tend to lack brightnes even when I use external flash on my Nikon D5200…so thanks a lot gain 🙂
May 22, 2014 at 6:57 pm
Charm says:
nice tutorial it works but it is depend on the image that you have how you brighten the image in your case it is on good quality it was just need to brighten but never the less your tutorial is understandable for the beginners! thumbs up!
June 2, 2014 at 8:53 pm
C.J. Hargreaves says:
Krista, do you the steps you used for scrapbooking would work to brighten photos to be published in a newspaper (on newsprint paper)?
June 6, 2014 at 2:43 pm
Krista says:
Hmmm…. They use black and white photos correct? I would go about changing the photo to black and white first, then try this “Lighten and Brighten” technique. Then tinker with each opacity of the “Soft Light and Screen” layers to your liking! Good luck!
November 4, 2014 at 3:02 am
Akinwunmi Stephen says:
Thanks a lot for this info, am grateful.
December 14, 2014 at 12:38 pm
Tanya says:
im confused as to how this works please send me step by step instructions
August 25, 2015 at 5:39 pm
Katherine says:
I absolutely love this tutorial! I really needed help making my blog posts pop, and this is the best (and easiest) way that I have found to brighten up my photos. 🙂
I’ll have to look over a few more of your tutorials, I’ll def. be tweeting about you soon.!
August 28, 2015 at 1:36 pm
Krista says:
How kind of you. Thank you!! I’m so glad that these tips helped you out. This one specific was like a “ta dah” moment for me when I learned.