Uploading your Layout and Linking Credits in a Gallery
Posted on under Getting Started in Digital Scrapbooking, TUTORIALS
Now that you know how to save your digital scrapbook layouts for the web, your 600x600px image is ready to share with your friends in the digital scrapbooking community. What now? Open a browser window to your favorite scrapbook gallery, and let’s get started! I’ll show you step by step how to upload your layout and link the products you used (commonly called “credits”) so that if someone loves the kit you used, they can find it easily.

Images in this post are from The Lilypad’s gallery, but should be generally applicable to any online gallery. Most digital scrapbook stores offer a gallery to share your layouts, and you can also post to an open gallery (not associated with a store) like DigiShopTalk, My Scrapbook Art, or Two Peas in a Bucket.
Step One | Check the Rules
Every gallery has their own set of guidelines, and usually lists these clearly on the main gallery page. You can see here that The Lilypad’s rules include using at least 50% TLP product, no offsite linking (meaning no links to product in other stores), and a size limit of 250k.

Step Two | Upload your Layout
Look at the above image again – see where it says Upload Photos on the right-hand side? Click that, and you’ll get to a screen with options for uploading, naming, and describing your image.
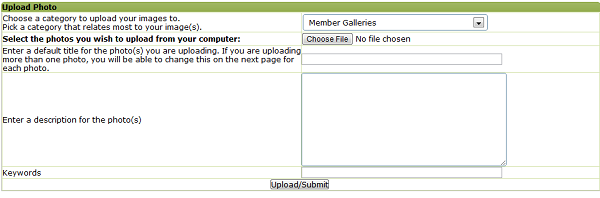
Some sites give you the option of uploading multiple images at a time, others only allow one at a time. Click Choose File and browse to the location on your computer where you saved your layout. Make sure you choose the web-sized version!
Step Three | Add Your Title
Type in your layout title, then move on to the description box\This is where you’ll list all the fun scrapbook supplies you used.
Step Four | Listing Your Credits
Credits. What are credits? Credits are when you list all the fun scrapbook supplies you used. Most stores require you to give credit to the designer whose product you used. This way if a fellow scrapper is browsing through the gallery and loves an item you used in your layout… they can find out exact where to get it. You can even link products directly to the product in the store to help enable your fellow shoppers, while not reqiured. Although if you’re on a creative team, most designers require linking. Don’t be scared off by the words “linking” or “HTML” – it’s really simple! We’ll get to the linking in a minute.
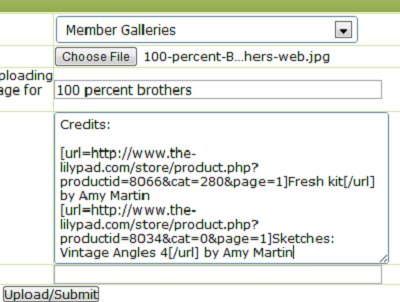
For basic credits, first, type out the Kit Name / Paper Pack Name / etc. that you used, and the Designer who made it.
For example, Here is my credit list for this 100 percent Brothers layout:
Fresh kit by One Little Bird and Sahlin Studio
Sketches: Vintage Angles 4 by Amy Martin
This list tells people what products I used in creating this layout. If they wanted to buy the same kit they’d have to go hunting in the store. Some scrappers like to be courteousy to fellow scrappers and link straight to the product. So to make it easier, you can easily add a simple HTML code in so that the name of the kit becomes “clickable,” and will take you straight to that kit in The Lilypad’s store.
Step Five | Adding HTML Tags
1) Find the product in the store. – To add an HTML tag to the name of your kit, first open a new web page and navigate to that kit in the store. Now highlight, right-click, and copy the web address at the top of the page – it will look something like this: http://www.the-lilypad.com/store/product.php?productid=8066
2) Now back to your list of credits. Right before the word(s) you want linked, type: [url=paste link here]. Immediately after the word you want linked, type [/url].
This is how my credit list looks in the Description Box now:
[url=http://www.the-lilypad.com/store/product.php?productid=8066]Fresh kit[/url] by One Little Bird and Sahlin Studio
[url=http://www.the-lilypad.com/store/product.php?productid=8034]Sketches: Vintage Angles 4[/url] by Amy Martin
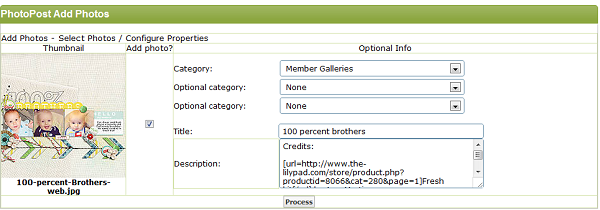
Looks confusing, right? Trust me! Click Upload/Submit, and you’ll get to this Optional Info screen. This is where you can choose additional categories for your photos, and confirm that everything is correct before uploading. For example, if you used Sahlin Studio product, you can select my category from the drop-down “Optional category” list. When you’re ready, click Process.
And that’s it! You’ll be returned to your personal gallery, which holds all the layouts you’ve ever uploaded to that particular site. Click on the new one, and take a look at the Photo Details area underneath the photo. See how your credits are now underlined? You can’t see the URL anymore, but it’s there, through the magic of HTML, and clicking on the name of the kit will take you straight to that kit in the store!

I hope this tutorial helped you get comfortable sharing your layouts on the web, and linking your credits. I would love to see your layouts in my Lilypad gallery! If you have any questions, please let me know!

October 12, 2012 at 10:02 pm
Easy Ways to Track your Credits | Sahlin Studio | Digital Scrapbooking Designs says:
[…] been following the blog lately, then you know how to save your layouts for the web, and how to upload a layout and properly link your credits in an online gallery. Now we’re ready to talk about how to keep track of those […]