Tutorial | Color Correcting Your Photos with Curves
Posted on under Photo Editing Tutorials, TUTORIALS
![]()
It is amazing to see the subtle changes to our photo as we continue through our photo editing. Be sure you check out the last two photo editing techniques we’ve learned in previous tutorials: lightening and defogging. The next step in our photo editing process is: Color Correcting Your Photos.
We all have them. Those photos where the color is just plain, OFF. I’m sure I’m not the only one to find some of my photos with on all-over ‘blueish’ tint to it. Well they can be easily fixed!!
There are so many ways that you can color correct a digital photos, but we are going to talk about using the Curves Adjustment to correct color. “Curves” is one of the many photo adjustment features available in Adobe Photoshop. I’m not going to get TOO technical… but it is a very powerful and useful tool for photo-editing and can do so much more that just color correcting. Let’s Begin. Go ahead and open up your photo in your Photoshop program and we will get started! I will be using Photoshop CS5 for this tutorial.
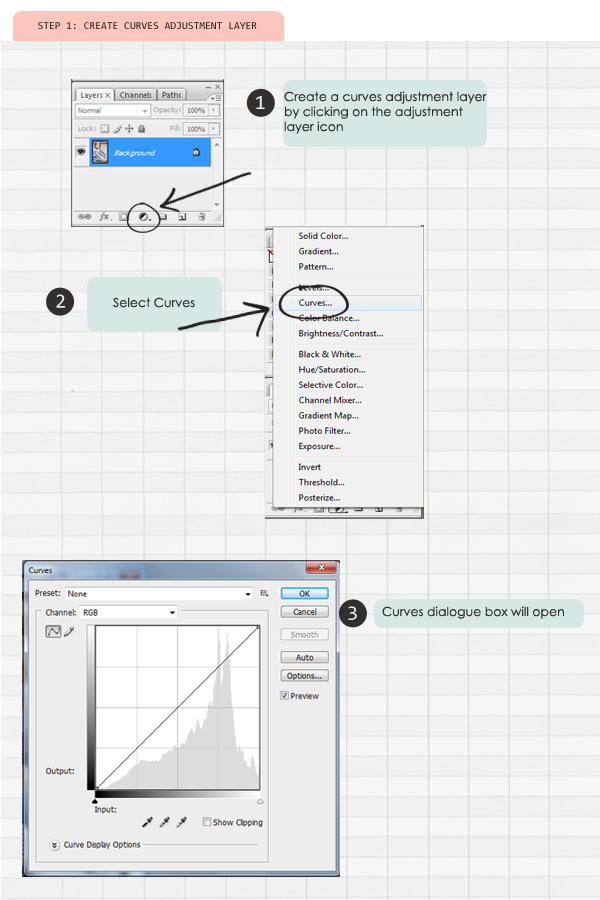
Step 1: Creating a Curves Adjustment Layer
Select Adjustment layer icon at the bottom of the layers palette
Select “Curves”, and a dialogue box will open
![]()
SET THE CURVES SETTINGS:
(This only needs to be done the VERY FIRST TIME)
Before we begin to color correct our photo, we will want to set the Black, Gray and White Point settings for our Photoshop program. Ideally you should set specific color values for each of these droppers. After you set them, your program will use these settings. (If you like you can skip this step and try with the default values).
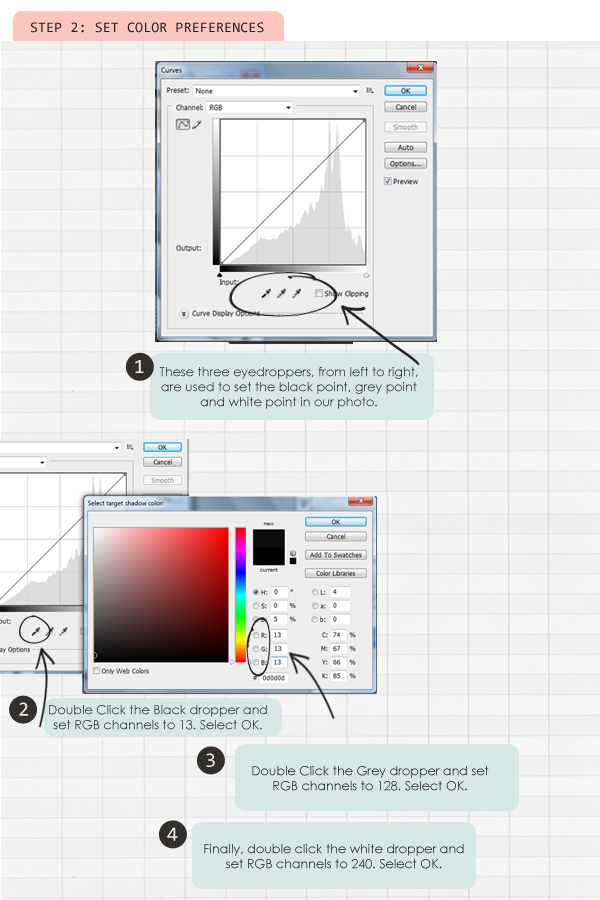
Step 2: Set Color Preferences
Double Click black eye dropper, and set RGB channels to 13.
Double Click grey eye dropper, and set RGB channels to 128.
Double Click white eye dropper, and set RGB channels to 240.
![]()
COLOR CORRECTING YOUR PHOTO
Now we are going to move onto the actual color correcting of our image. There are two (2) ways you could do this, depending on how much of a perfectionist you are. HAHA!! The first way is to select the Black, White, Gray Points randomly (or be visually finding those points) The second way is to use the photograph’s THRESHOLD to find a more exact black and white points on your photo.
1) Using Random Selection
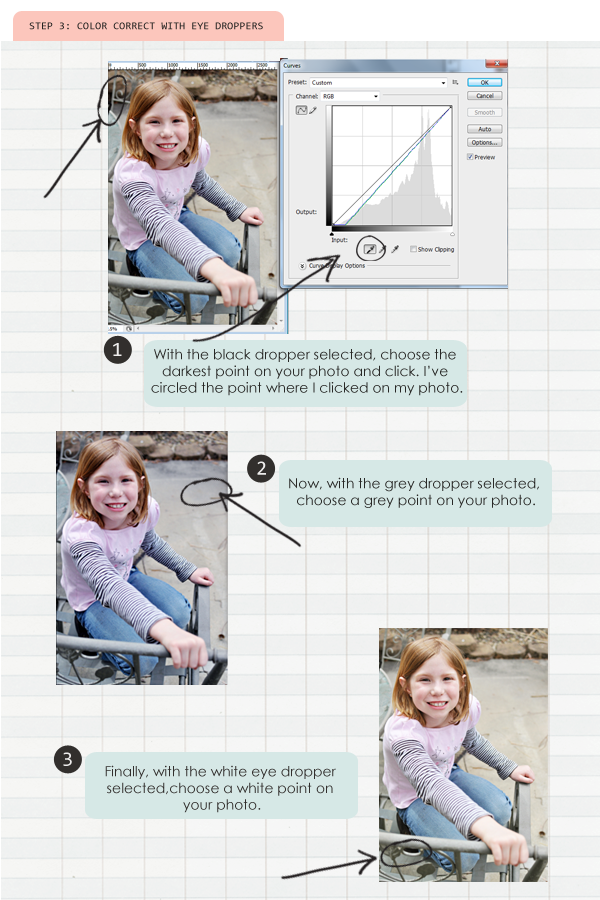
Step 3: Color Correcting Using an Eye Dropper
–With black eye dropper selected, choose a black tone on your photo and select. Click OK.
–New Adjustment layer. Select the white eye dropper, and choose a white spot on your photo. Click OK.
-New Adjustment layer. Select the grey eye dropper, choose a grey spot on your photo. Click OK.
You will notice that no matter how similar your tones appear, every place on your photo that you select, will produce a different outcome. The key is to find the point that is pleasing to your eye. The best advantage to having each tone (black, grey, and white) on its own layer, is that you can adjust each layers opacity to give you more control of your final outcome.
2) Using Threshold
There is a more exact method of finding the black, grey and white tones in your photo. To do this, you would use the photo’s threshold. What is a Threshold you ask?? Well, the Threshold is just a tool that you can use to find the BLACKEST Black Spot, and the LIGHTEST spot in your photograph. Then you cancel out of the Threshold, and begin the same technique we learned above with the Eye Droppers.
To find the “Black” Tone:
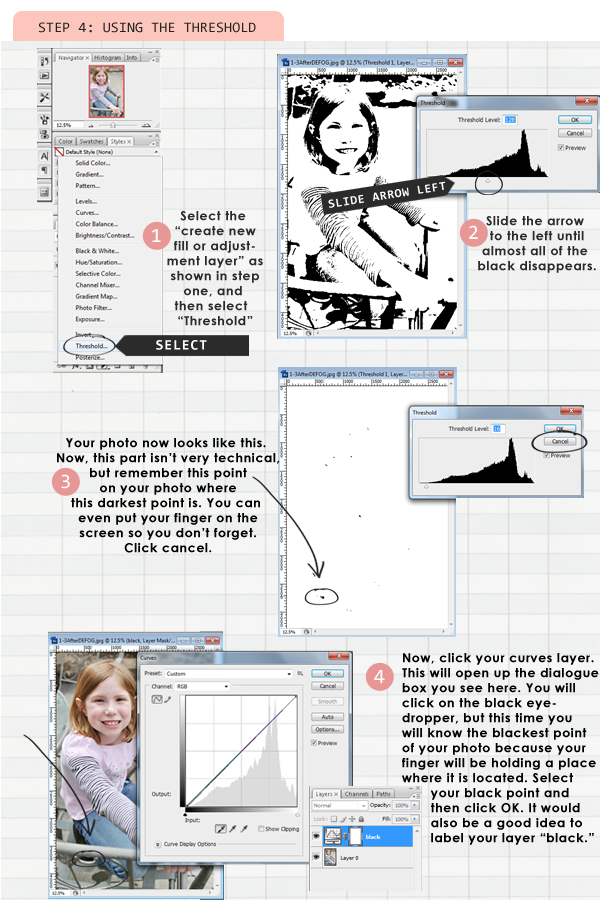
Step 4:
Select threshold from the adjustment layer icon
Move slider to the left to find blackest point on your image, and mark it with your finger.
Double click on the curves adjustment layer and select your black eye-dropper.
Click on the darkest point of your photo that you have marked.
Label your layer – Black Adjustment
To find the “White” Tone:
You will follow the same steps outlined above to find the white in your photo.

Step 5:
Be sure to put it on its own layer!
Select the adjustment layer icon and select curves.
Open the threshold.
Move the slider to the right until almost all white disappears.
Mark the whitest point of your photo with your finger.
Click on your white curves layer and select that whitest point of your photo. Select OK.
Label your layer – White Adjustment
To find the “Grey” Tone:
Finding the GREY spot in a photo can be difficult. Sometimes the best you can do is pick a point that seems like a good candidate for grey and see what happens to the image. If it gets worse, undo it. When you hit one that seems good, you’re done! TIP: There is a trick for finding natural grey in portraits. Sometimes pinking a point in the whites of the eyes is the best spot for finding the Gray point. Normally the whites of our eyes are not truly white, so it’s the perfect place to find your grey tone. This doesn’t always work (some people’s eyes are whiter than others), but when it does it works wonders.

ZOOM in really close to the eye.
Then as described in step 3, Select the adjustment layer icon and select curves.
Select the grey eye dropper and use the whites of the eye to find our grey. Select OK.
Be sure to Label third third layer – Grey Adjustment.
Whether you select your colors randomly or find them using the threshold, every place on your photo that you select will produce a different outcome. So go with what you feel looks the best. There is NO right or wrong way. Everyone has a different opinion of how photos should look. Some like a sharper contrast, while others like a soft, hazy feel to their photos. Play around with each of these settings and find the point that is comfortable to you. Also, play around with each layers opacity for your perfect color..
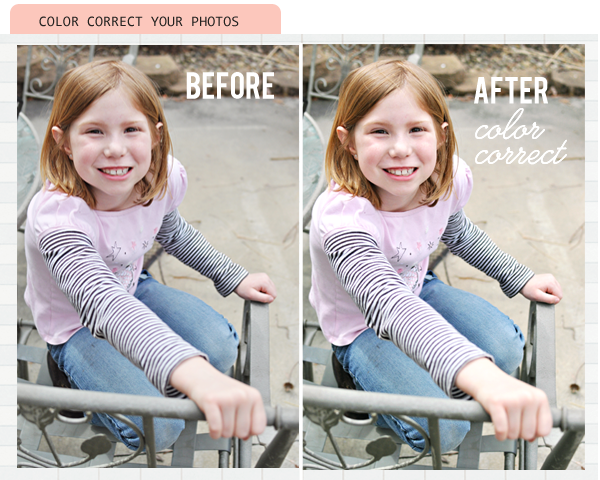
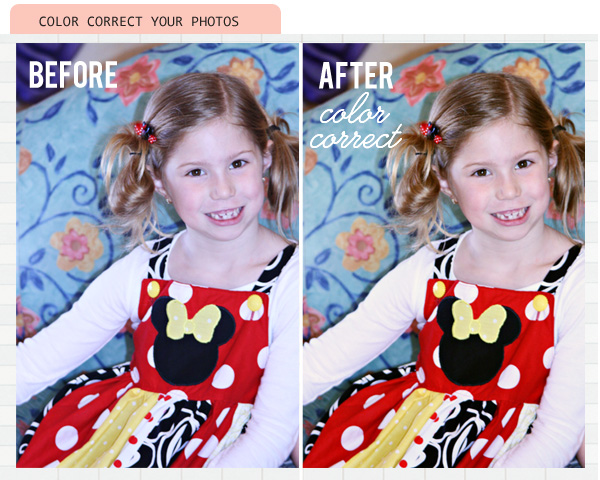
Before & After
Here are a couple comparison of our photo before and after color correcting. You can see how the color changed in these photos. It is especially noticeable in the skin. My photos went from a bluish tint, to a rosy natural skin tone.
I hope these steps help you to bring our your photos TRUE color.

April 1, 2012 at 3:33 pm
Jan in Alberta says:
Wow, this was a very powerful tut! I just colour corrected a photo of my daughter against a snowy background and it was like a miracle! You can see the detail in her snow pants now. Awesome!
April 12, 2012 at 10:12 am
Krista says:
Isn’t this amazing? I’m still amazing at what small tweaks can do in making your photos look even more amazing.
April 2, 2012 at 5:28 am
Valentine says:
Thanks for this great tip! Never used curves like this before, but I’m gonna use this a lot!
April 4, 2012 at 4:24 pm
HeatherB says:
Krista, this is hands-down the best colour correcting tut I’ve come across. Easy to understand yet getting right in there with Photoshop. Thank you for posting this!
April 12, 2012 at 10:11 am
Krista says:
You are SO sweet!@! Thanks Heather! Glad you found this useful.
April 4, 2012 at 7:53 pm
Jennifer B. says:
Thank you for sharing! 🙂
April 5, 2012 at 10:39 am
Nadia says:
Wow, this is so useful… Thanks for the tutorial 🙂
April 11, 2012 at 3:19 pm
Leslie says:
In the last photo pair, the left photo has a lot of magenta splotching on it. My photos sometimes have this, too. What is it, why do I have it, and how to I get rid of it? Sometimes, it seems, to get rid of it, I have to make the photo bluer than I’d want to. :-/
April 12, 2012 at 10:11 am
Krista says:
Hi Leslie, I’m not seeing exactly what you are talking about…. But I’d sure love to help. Do you have an example to show me? Feel free to send it to me! 🙂 My email addy is: sahlinaks@aol.com The “Minnie” photo on the left is the original photo SOCC (straight out of the camera). There may be more magenta in this particular photo becuase it has a whole overall “blueish” tint. So to “correct” I find it needs to have warmer tones added to balance or make creamier. Does that make sense?
April 12, 2012 at 10:56 am
Leslie says:
In your blog post, the picture of Minnie, the left one, to my eye and on my monitor seems to not just have a magenta cast, but there seems to be real magenta burn out on her face–like splotches or fringing. You don’t see that?
August 19, 2012 at 12:37 pm
Photo Enhancement - Let's Talk Levels. | Sahlin Studio | Digital Scrapbooking Designs says:
[…] (This may be the easiest way to adjust your photo levels) Click the white eyedropper and click on a spot in your photo that is suppose to be white. This should adjust the white and all other colors in your photo. The other eyedroppers, the black and gray, can be used if there is no white in your photo, and it will adjust your colors accordingly. If you are not happy with the result, just click reset and start again. If you want MORE information on using the eye dropper (and finding the white, black, gray points in your photo), be sure to check out this tutorial. […]
August 1, 2013 at 9:08 pm
Norinda says:
Thank you soooo very much! I’m trying to teach myself Photoshop CS5… I had the WORST time trying to find the grey point. Love the trick with the eye 🙂 Thank you again for the tutorial!
February 15, 2014 at 12:15 am
Cherilyn Kynaston says:
Thanks for the tips – I’m always trying to learn as much as I can, and it seems like there is no end to learning in Photoshop! I just wanted to share a tip on how I’ve been able to find the black and white point without having to do threshold, but doing it all inside the curves dialog box – I learned this from my print shop! (I’m using PS CS4).
Open the Curves Dialog, and hold down ctrl as you move the little black or white triangle to it’s opposite end and it will show you where the brightest white is and the darkest blacks. Return them to their correct position and then click on the dropper and find that dot just as your tutorial explains. Hope it’s helpful!
December 25, 2015 at 3:07 am
Harshad G Makwana says:
hello ,,,,,,
i start learning photoshop cs5 so i thik it’s goood for me…