Tutorial | Defog Your Digital Pictures
Posted on under Photo Editing Tutorials, TUTORIALS
Today we are going to talk about – Defogging Your Photos.
Last week we learned how to “How to Lighten & Brighten Photos“. We will be using the same photo from the previous post. So you can see as we go through the full photo editing process. Here is our original photo, along with the photo after Step 1: Lighten and Brightening.
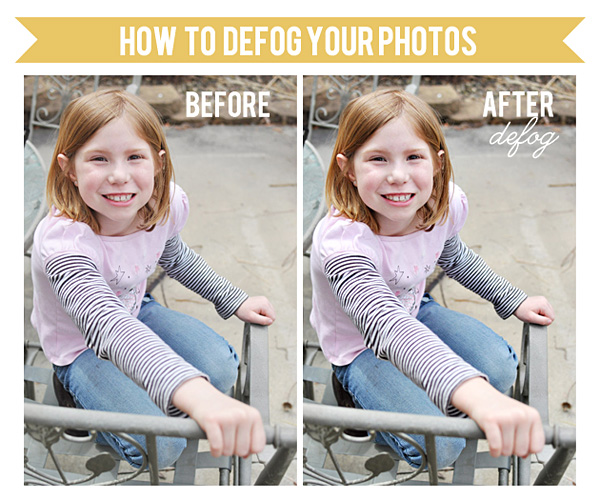
You might not even notice, but all digital images have a slight ‘haze’ or “fog” over them. Give this tutorial a try and you could be surprised at the amazing difference it will make in the clarity of your picture. Defogging is the process of removing the gray haze in your digital photos, making them a little clearer. This should be one of the first steps in your photo editing process, and it’s surprisingly very easy it is to do. My photo editing is done in CS5, but these similar steps can be taken in Photoshop Elements.
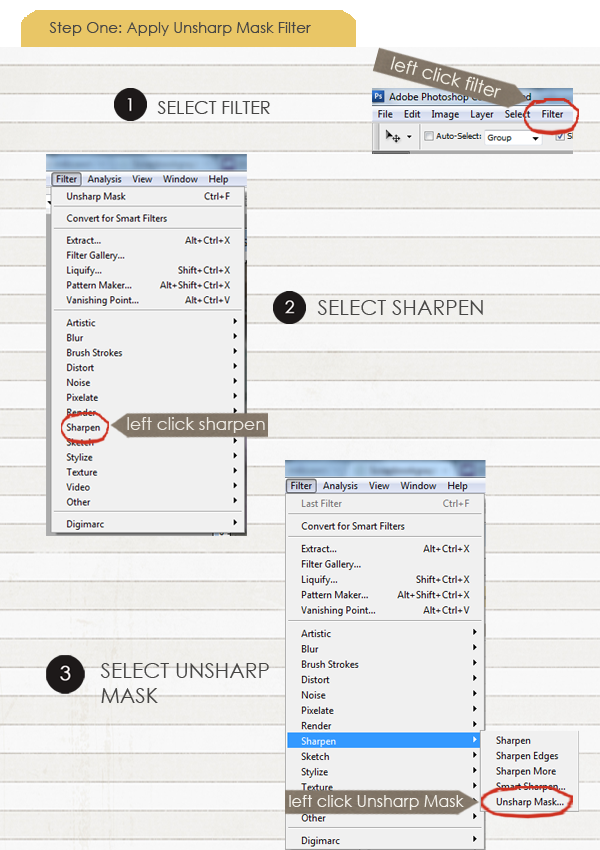
To start, apply the “Unsharp Mask” Filter.
Step One: Apply the “Unsharp Mask” Filter
1. Filter>Sharpen>Unsharp Mask
1. For PSE Users: Enhance (rather than Filter)
Once you have selected the Unsharp Mask filter, a box will open up with some setting choices.
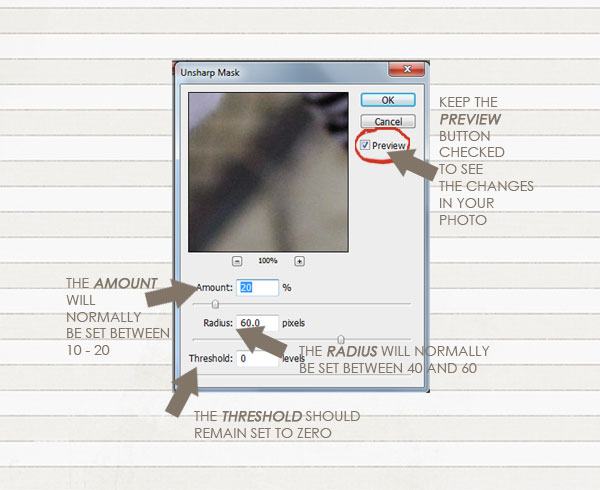
There are three adjustments that can be made. I personally use: 10 / 50 / 0.
Amount: 10
Radius: 50
Thresold: 0
Common Defog settings are 20 / 60 / 0 and 10/50/0. But I find the 20 / 60 / 0 setting WAY too strong – especially since we will be doing other things to the photograph later (such as color pop and sharpening). You don’t want you photo to look too extreme… which is why I personally use: 10, 50, 0. It crispens the photo just a bit, and gets rid of the fog. But try tinkering with the settings. Always play and tweak your photo until it looks just right to you. You’ll just want to stay within these levels: 10-20, radius: 40-60, threshold 0. My advice would be to use the least amount you need. Toggle back and forth between your defogged and undefogged photo to see your results!!
This technique is very subtle… but the results are amazing!
Check out some closeup views of Before and After DEFOGGING:

See how it crisps the lines on the sleeve and the stars on her shirt. The settings I used for my photo were 10-50-0. The difference is subtle, but as I mentioned before I don’t want to make it too harsh.
(HOVER OVER TO SEE THE SUBTLE CHANGES – BEFORE / AFTER)

If you can’t see the HOVER images above, see here:


I hope this has been a help to you!

March 15, 2012 at 11:45 pm
Heather says:
Leaning about defogging years ago made a huge difference in my pics! I do the 20/60/0, but then I use the fade option to go down so it’s not as harsh. Usually I’ll Fade 70%, but depending on the pic, I’ll go anywhere from 60-80%.
March 16, 2012 at 1:37 pm
Krista says:
Isn’t this an amazing tool? So glad you are finding it helps your photos!
March 16, 2012 at 6:24 pm
jayleigh says:
i was a journalist for a couple small newspapers and used the unsharp mask all the time when i was fixing my photos for the newspaper. But, duh! i have no idea why i didn’t transfer that knowledge over to my personal digi-photos! Thanks for the “kick in the pants” superb tutorial/reminder! Excellently and concisely written!
March 16, 2012 at 8:24 pm
Karen F says:
Really great idea.Thanks so much for the info and great explanation. Even better I have the same software so can go with your instructions exactly to practice.
March 17, 2012 at 2:22 pm
Melissa Schad says:
Awesome tutorial! I am still new to this digital stuff…….I guess it’s been a year, but I’m always learning new things! THANKS!
April 1, 2012 at 1:28 pm
Tutorial | Color Correcting Your Photos with Curves | Sahlin Studio | Digital Scrapbooking Designs says:
[…] out the last two photo editing techniques we’ve learned in previous tutorials: lightening and defogging. The next step in our photo editing process is: Color Correcting Your […]
April 21, 2012 at 10:13 am
Claret says:
Thanks for the info – definitely a try on my next photo editing.
August 31, 2012 at 9:53 pm
MJO says:
In my *Filter list on PSE9.. It doesnt have sharpen… it goes from Render to Sketch.. Any suggestions?
September 4, 2012 at 9:33 am
Krista says:
I don’t personally have PSE to check… but I’m checking with my creative team members to see if anyone uses this program. I’ll be back with any answers if I can find out for you! 😉
September 4, 2012 at 12:00 pm
Krista says:
Here is an answer for you using PSE: Try looking under ENHANCE rather than FILTER. You can also use the sharpen tool in the tool tray (it’s the set of icons with blur, sharpen and smudge) if she wants to brush over certain areas.
But for the UNSHARP MASK, she needs to do the following (instructions obtained from Adobe PSE Forum): In the Edit workspace, select an image, layer, or area. Choose Enhance > Unsharp Mask. Select the Preview option.
Set any of these options and click OK: Amount Determines how much to increase the contrast of pixels. For high-resolution printed images, an amount between 150% and 200% is usually best. Radius Specifies the number of pixels to sharpen around edges. For high-resolution images, a radius between 1 and 2 is usually recommended. A lower value sharpens only the edge pixels, whereas a higher value sharpens a wider band of pixels. This effect is much less noticeable in print than on‑screen, because a 2‑pixel radius represents a smaller area in a high-resolution printed image. Threshold Determines how far different pixels must be from the surrounding area before they are considered edge pixels and sharpened. To avoid introducing noise (in images with flesh tones, for example), experiment with Threshold values between 2 and 20. The default Threshold value (0) sharpens all pixels in the image.
November 15, 2012 at 4:54 pm
Liz says:
I have PSE and pull up the unsharp mask through the enhance drop-down like you last mentioned. It looks exactly how yours looks. I am wondering which values to use, though. The ones you suggested are quite different from information you got from the Adobe PSE Forum.
20 – 60 – 0
vs
160 – 1 – 20 (or the like)
Should the number I use be different solely because I am using PSE?
December 12, 2012 at 8:35 am
Tutorial | Photo Sharpening | Sahlin Studio | Digital Scrapbooking Designs says:
[…] now the High Pass filter is used just as often. I personally like to use the Unsharp Mask, to DEFOG (defog tutorial) my pictures at the beginning of my photo editing process. Then I use the “High Pass” […]
March 20, 2014 at 4:32 pm
Carissa says:
Thanks for sharing your thoughts on photoshop.
Regards
Stop by my blog: adobe; Carissa,
April 14, 2014 at 7:16 am
how to make a homemade pregnancy test says:
Hi, I want to subscribe for this blog to get newest updates, so where can i do it please help
out.
Look into my site: how to make a homemade pregnancy test
September 5, 2014 at 3:44 pm
Peggy S says:
Thank you for this! I like this much better than the settings someone else recommended.
September 5, 2014 at 4:26 pm
Karen says:
Oh my word this is awesome and totally helps! Thanks so much for sharing! Is there something similar that works in lightroom?
September 9, 2014 at 6:31 am
Little Things | Two More Days says:
[…] It’s the little things that can make a huge difference in your photos. Learn how to defog your digital photos. […]