Tutorial | How to Align and Distribute
Posted on under Photoshop Tutorials, TUTORIALS
Have you ever wondered how you can easily line up all of your photos? Or how to evenly space them apart? I will show you easy techniques on how to use the align and distribute tools in Photoshop to do some pretty cool things. Don’t let the big words
in the title of this tutorial scare you away. I think this information will be a major learning moment for some of you and it is so simple! I promise you will be using these for everything, to get a perfect grid block for clipping papers OR evenly space elements.

Today we are discussing the Align and Distribute Tools in Photoshop!
Whether you are using the align tool, or the distribute tool, each tool has a different result.
Align Tool
The align tool will line up your elements or shapes.
You can choose whether it will line up the top, bottom, left, right or center.
Distribute Tool
The distribute tool will put an equal distance between your elements.
It will evenly distance them out from left to right, or from top to bottom.
![]()
Below, I will give you an idea of what both of these tools look like and what they do.
For this tutorial I am going to create some square shapes for our example.
For a Grid Look – Start with Square Shapes
Step One: Start by Creating Shapes
1. Using our previous tutorial on making shapes, create three boxes that are of equal shape.
(The simplest way to do this is to create one shape and duplicate the layer two times.)

After you have your shapes or elements, we are ready to begin Aligning and Distributing the Space.
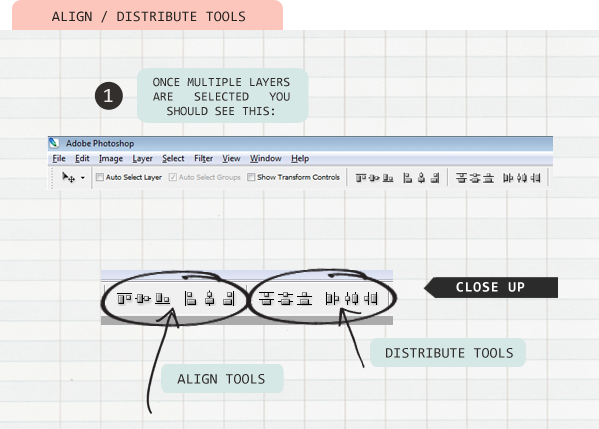
Where do you look for the the Align and Distribute Tools? Here is a screen shot of where to find them.
For PSE users, click on the small down arrow to the right of ‘Align’ or ‘Distribute’ to see the menu items.
Using Your Align Tool
Step 2: Align Your Shapes or Elements
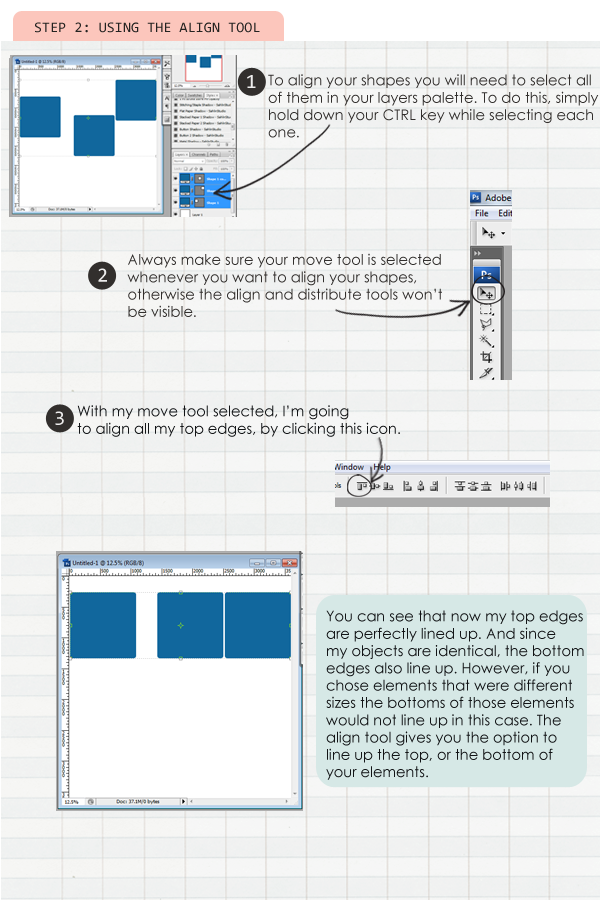
1. Select all the layers you will be aligning, but holding down your CTRL button and selecting each layer.
2. Make sure your move tool is selected so the align and distribute tools will be visible.
3. Select the appropriate align tool, to line up the edges of your elements
– either Horizontal or Vertical, then chose Left, Right or Center Align
Using Your Distribute Tool
Step 3: Distribute Your Shapes or Elements
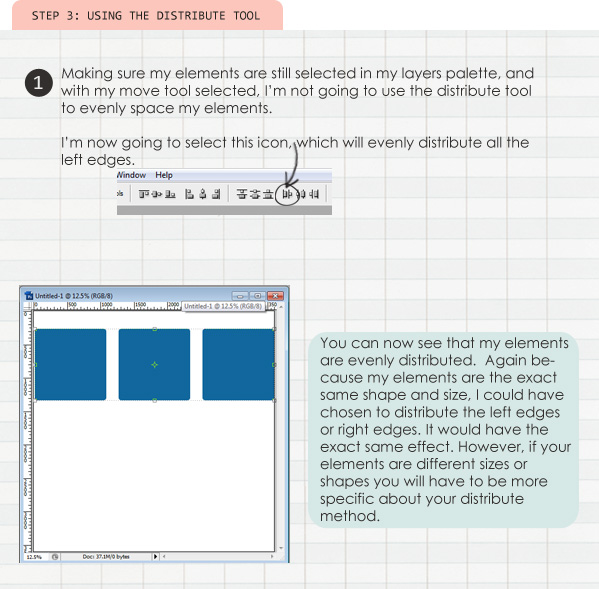
1. Make sure the elements you want to distribute are still selected in your layers palette.
2. Choose the appropriate distribute tool – Horizontal or Vertical, then Left, Right or Center Distribute
EXAMPLE
Would you like to see how the Align and Distribute tools can be applied to a scrapbooking layout?
Here I used squares to create a grid, and it was easily centered and distributed evenly. For a tutorial on how to “clip” papers or photos to a shape look here.

Now onto some examples on how to use it for items other than a square box.
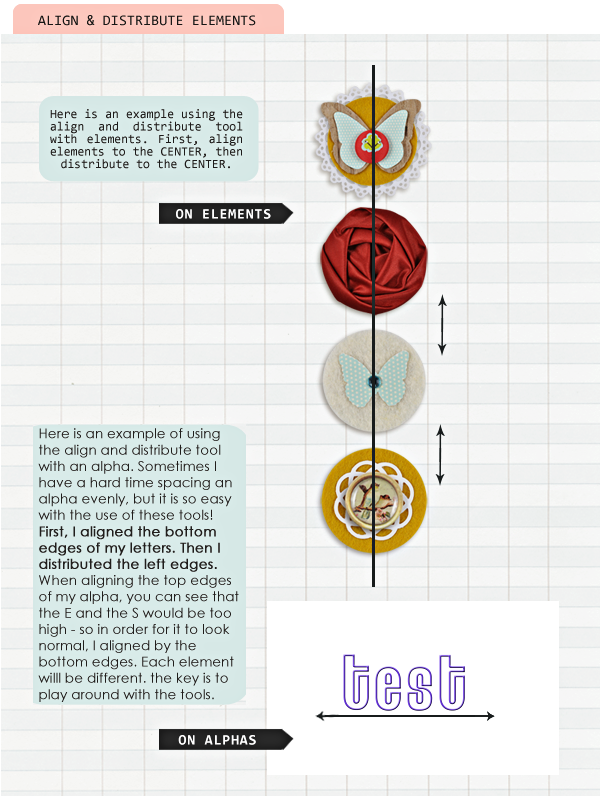
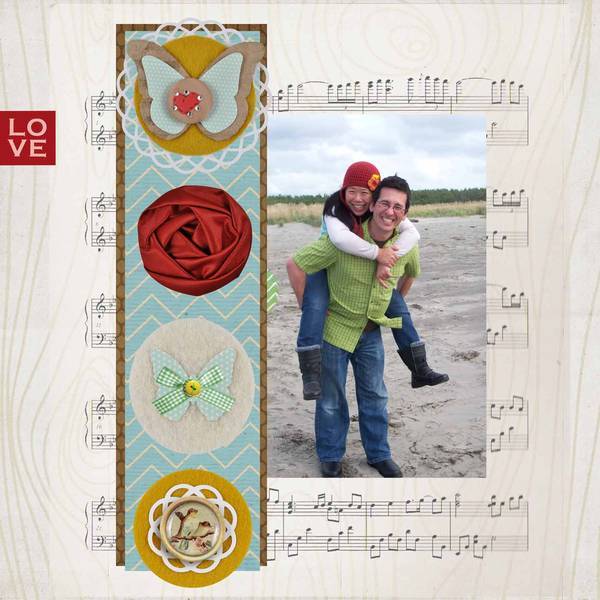
Here is an example of a layout using these tools for the elements on a scrapbook layout.
Fun on the Beach Layout by kwiener
The align and distribute tool are wonderful tools – and so much quicker than “eye-balling” your elements when trying to line them up. I hope this has been a help to you!

May 8, 2012 at 12:16 pm
Photoshop Download says:
Excellent tutorials, thanks for share.
May 8, 2012 at 7:33 pm
Shawna says:
Krista – Would you be willing to teach a mini-class on digital scrapbooking for some locals??? Shawna 🙂
May 9, 2012 at 12:13 pm
Krista says:
Anytime for you hun!! I haven’t seen you guys in forever!! Hope things are well. Send me an email and we can get together sometime. I don’t know if it would be a class… but we can scrap and go through a few things. 😉
May 9, 2012 at 10:44 am
Colleen says:
Awesome tip !! Thank you for sharing. I know I will be using this in the near future.
May 9, 2012 at 5:02 pm
Carrie says:
Thank you so much. I am just learning Photoshop and am so thankful when I come upon great tutorials like this. Thank you for taking the time to share this.
May 9, 2012 at 5:06 pm
Krista says:
I’m SO glad!! I’m remember starting out and learning new things.
I hope this gives you a “A HA” moment.
May 9, 2012 at 6:27 pm
Annisa says:
This is an awesome tutorial – thanks so much! I use PS 7.0 (not elements) and in order to select my layers I have to link them. Holding control doesn’t work. Hope that helps someone else with my version of PS! 🙂
May 9, 2012 at 8:04 pm
Karen W says:
love it – so obvious once you do it but I needed to be pointed in the right direction – thanks! x
May 11, 2012 at 9:56 am
Melanie says:
I knew aligning things was possible and now I know how. Thank you for taking the time to share!
May 11, 2012 at 10:28 am
Helen says:
This is defenitly an A-HA! moment hihi thank you for the tut!
May 11, 2012 at 2:04 pm
Debi says:
Thanks for this tutorial. I am a beginner in scrapbooking and was trying to figure out how to do this on one of my layouts. This tutorial came at just the right time for me!
May 11, 2012 at 9:13 pm
Bonnie Cooper says:
wow, I have used Photoshop for so long but used the guides and eyeballs and was never happy… haha… I guess I read the parts of the manual that I thought I needed and let it go at that… thanks so much!
May 11, 2012 at 10:46 pm
Whitney says:
Thank you!! I was wondering what those buttons did 😀 Can’t wait to try it out!
May 12, 2012 at 1:44 pm
rachel verdi says:
It always amazes me just how much more I have to learn in photoshop, and I’ve been doing it for 4 years, now! lol I had no idea you could do this so simply. I’m the yahoo that ‘eyeballs’ things to get them to align, and always ends up noticing wonky placement after I’ve posted my layout. 😉 Thanks for this! Very handy tip!
rachel
May 13, 2012 at 6:16 am
Vera says:
Thank you for the tutorial! I am super sure this will come in handy 🙂
May 14, 2012 at 7:42 pm
Sara says:
What a great tutorial – thanks so much for sharing. I have been using PSE to edit my photos, but would like to use it for so much more and you have certainly helped!
June 9, 2012 at 3:38 pm
Betty Holland says:
Krista, thanks SO much for this super time saving tutorial. I am embarrased now after 2 years of digital scrapbooking, and being a self taught PSE user, that I spent countless hours aligning my titles and embellishments by “eye” (or using the ruler or grid). You’re the best!!!!
June 12, 2012 at 7:46 am
Krista says:
HAHA!!! We’ve all been there. This is an Aha moment for sure. So glad it helped!
June 27, 2014 at 8:50 am
Jacqueline says:
Wow, what an amazing tip! Thanks for sharing!
June 27, 2014 at 1:14 pm
Tiffany Green says:
I’m a photographer and have been designing albums and other things for years and I hate to say it, but I’ve always done it the hard way, using guides and zooming in. This was TOTALLY an “aha!” moment for me that will make my life a million times easier and my design process a million times faster! LOL! Thank you!
June 30, 2014 at 9:45 am
Krista says:
HAHA!!! Isn’t this the BEST tip ever? LOVE!! So glad you found this too… it will save you SO much time!!
August 31, 2014 at 5:39 am
Lahcen says:
help!!
How to Align and Distribute Layers in Photoshop 7.0 ME ?