Tutorial | Installing and Using Photoshop Actions
Posted on under Scrapbooking Tutorials, TUTORIALS
I often get requests for help in digital scrapping and it is always my privilege to share what I know. Our topic for today will be focused on actions – how to install and use them!
An action is a recording of a series of commands that you can “play” in your Photoshop program. Some of my favorite Photoshop actions are those that can be applied in photo editing. In fact there are so many free actions out there and I hope to highlight some of my favorites from time to time, so be sure to add my blog to your reader and check back!
Actions might be new to some of you, so I thought it would be helpful to give you an explanation of how to install and use them.
First, you need an action to install. Photo actions are some of the easiest to play around with, so we will start with those. Some of my favorite photo actions come from Sarah Cornish of My Four Hens Photography. She sells some really amazing actions, but she also has freebies that you can try out. Be sure to “like” her Facebook page for more freebies that she offers from time to time as well.
Adding/Loading New Actions
Your program came with some default actions, but it is very easy to add your own. The first thing you will want to do once you’ve downloaded and unzipped your actions is to open up your Photoshop program. You can see in my screenshot where you will find the location of the actions in your software.
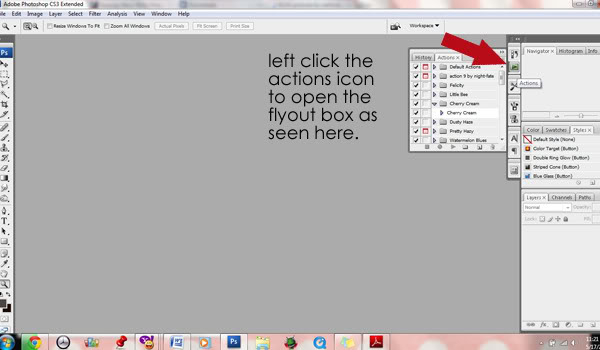
OR to get there click on Windows>Actions. To install new actions, start by clicking the small arrow here…
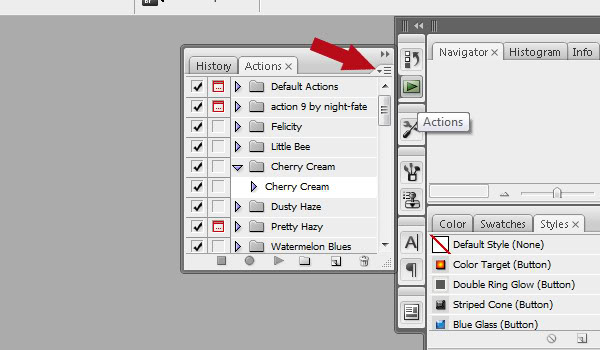
Another fly-out box will appear that will give you the option to load new actions into your program.
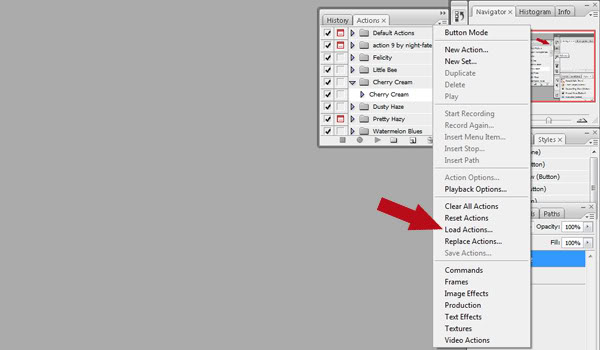
Click “load actions” and a browser window will pop up.
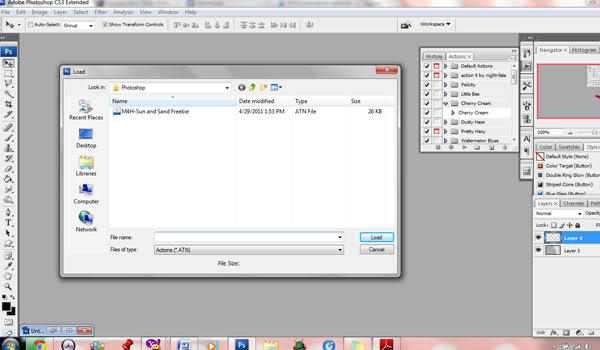
You will then navigate to where you saved your action. Once you have located it, you will select the specific action you want to install by clicking that action (atn file). The next step is to click “load” at the bottom right hand corner of the browser window. You now have a new action loaded into your Photoshop program! Easy peasy, right?
Using Actions
Using your new action is also very easy. Go ahead and open up a photo that you want to edit. When your photo is opened up, you will click your actions icon again to open the fly-out window. You will select the action you want to use and then press the “play” button to run the action on your photo.

Once your action has run your layers palette will look like this.

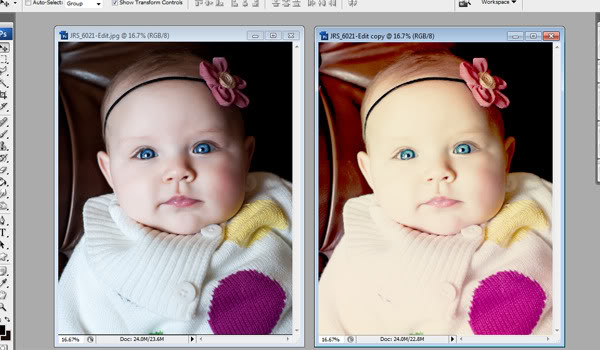
You will need to flatten your image. To do this go to layer>flatten image. You can now save as a jpeg image. I ran a bold action so you could see the difference between the original photo and the new one.
You will want to play with your actions to see which ones look best on your original photos. You can even run duplicate actions that will change the whole look. Some actions, like those that you will buy from Sarah Cornish, duplicate your photo automatically. However not all actions do, so you will want to make it a practice to save your original photo and work off of a copy.
I hope this has been a help to you! I love actions and they are so fun to play around with. They add some real character to your scrapbook pages! Another benefit to actions is they can sometimes alter the color of your photos. I find this really helpful when I want to match a photo to a specific kit. You can even see how the photo above is much creamier after the action has been applied.
Have fun and play around with your actions. And as I mentioned before, be sure to check back. In the future I will be sharing some of my favorite actions and where to find some freebies to add to your new stash!
For those of you who are Photoshop Elements users, feel free to try Google for tutorials on loading actions, or here is a place that may get you started.


August 22, 2012 at 4:43 pm
Save Digital Scrapbooking Layouts for the Web | Sahlin Studio | Digital Scrapbooking Designs says:
[…] web with one click. If you need help installing the action, we have a tutorial for that! Check out How to Install and Use Actions here. Print, Web, Sharpen Images Action from Sahlin Studio Pin […]
September 27, 2012 at 1:33 pm
Want to know HOW-TO?? Check out these TUTORIALS | Sahlin Studio | Digital Scrapbooking Designs says:
[…] Actions PHOTO EDITING:Fix a photo with grain or NOISEInstall ActionsRescue a Dark Photo Make Dark Under Eye Disappear – Tips and Tricks @ TLPRecoloring: “Tips […]
December 22, 2015 at 2:02 am
Easy Tricks to Scrap Less-Than-Perfect Photos | Traci Reed Designs says:
[…] are a number of tutorials that could help you if you are unsure of how. This solution is especially helpful if your photo is […]