Tutorial | Erasing Dark Under-Eye Shadows
Posted on under Photo Editing Tutorials, TUTORIALS
Just about every photo has them…Dark Circles Under the Eyes. Sometimes they are caused by harsh shadows from the staging of our photo, but most time it is just because we haven’t gotten enough sleep! Whatever the cause, today I’ll go through HOW you can get rid of those in your photo.

Fixing Dark Under Eye Shadows
To begin, open a photo that needs some adjusting.
Then follow these few steps to make those dark under eye circles disappear!
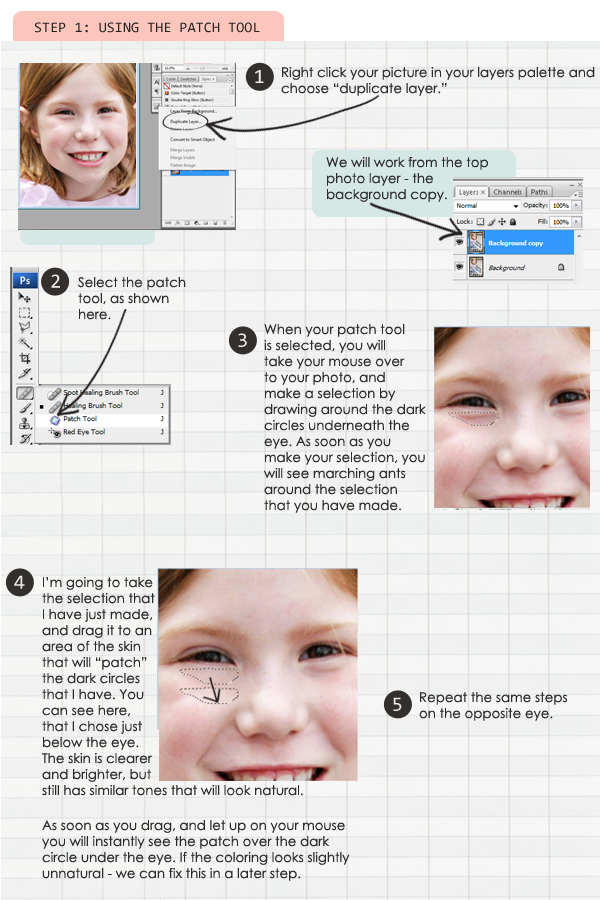
Step One:
1. Duplicate your photo
2. Select the Patch tool
3. Draw a circle around the dark area that you want to lighten
4. Drag and Pull your selection to a lighter area of the face that will patch the dark circles.
Now that I have patched both eyes, you can see the drastic difference here: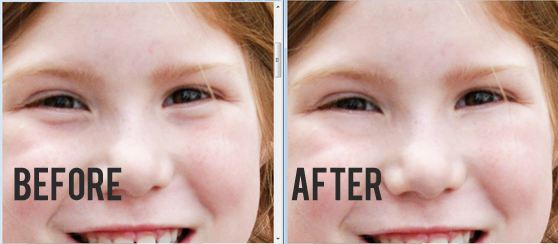
We aren’t done yet however. The next step is to achieve a more natural look. The reason why we originally duplicated our photo in step one, is so we can make adjustments. You can see in my after photo, that I have completely covered up any shadows, creases, or lines. This can tend to look unnatural… So an easy way is to blend it into the original photo, by reducing the opacity.
Step 2: Reduce Opacity of Layer
1. Select your adjustment layer
2. Adjust the Opacity
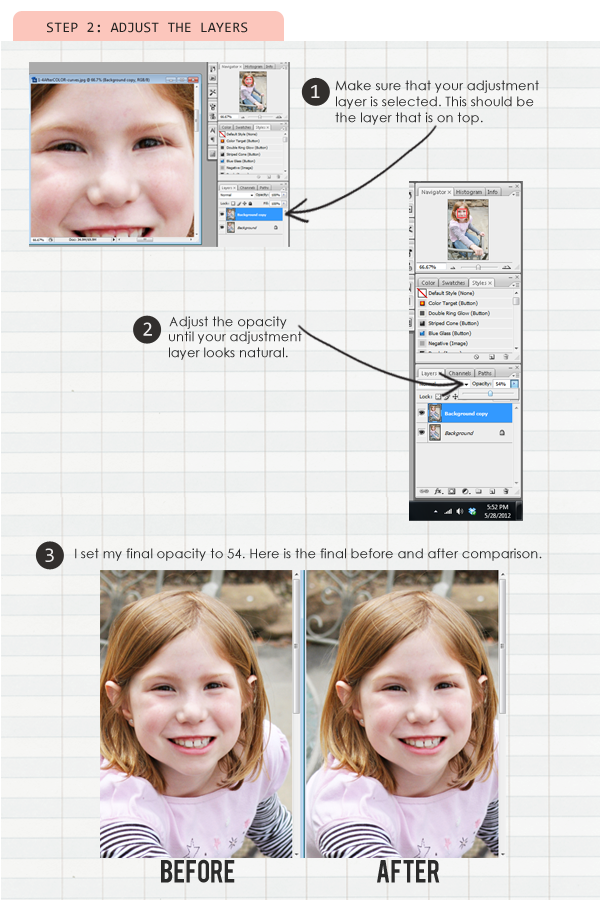
Each photo will be different. Sometimes the shadows are harsh, sometimes lighter… Therefore the opacity percentage will differ from photo to photo. Just go for the most natural look.
So, there you have it. A very simple way to get rid of the unsightly dark circles! I hope this has been helpful! As always, if you have any questions, feel free to leave them in the comment section of this post!

May 30, 2012 at 9:12 am
Laurie Weber(Lor) says:
Great tutorial! I must try this! Thank you so much for sharing your knowledge; It’s much appreciated! 🙂
May 30, 2012 at 10:01 am
Colleen says:
Thank you so much for sharing! I know I will be putting this tip to good use!
May 30, 2012 at 12:52 pm
Elaine says:
Great tutorial… I’ve always struggled with under eye circles.. Can’t wait to try it out!,
May 30, 2012 at 1:22 pm
HeatherB says:
Another amazing tutorial Krista – thank you! 🙂
May 30, 2012 at 5:33 pm
Jayleigh says:
Hey! That’s a really great Tute! i can see how that technique could be used for other things, too. Thanks for putting it together–The photos are perfect and you wrote very precisely and clearly.
May 30, 2012 at 6:56 pm
Marlene Lehman says:
Thanks for the tutorial….will try it soon.
May 30, 2012 at 7:16 pm
orachel says:
Doh! Now you tell me! lol I just had a photo published with the worst under eye circles. I was trying to blend em away with clone, but your way is SO much better. Thanks so much!
May 31, 2012 at 9:43 am
Krista says:
I’m so glad this worked for you!! Isn’t it like a miracle button?
May 30, 2012 at 7:41 pm
Jennifer B. says:
Thank you!
June 1, 2012 at 11:27 am
Bing says:
Thank you for this tutorial! I always check your blog for awesome tutorial like this. Thanks for sharing!
August 2, 2014 at 2:35 pm
Sarah (PLM) says:
Thanks, I’ll try this tip out, been wondering how to do that!