Fixing Photo Blemishes in Photoshop
Posted on under Photo Editing Tutorials, TUTORIALS
Photo Blemishes. Many of our photos have them. Murphy’s law tends to kick in at just the right time, doesn’t it? It happens to the best of us – your child falls and bruises his forehead the day before the big photo shoot. Or your teenage girl has that untimely breakout of pimples right before her Senior head shots?
Well, thank God for the beauty of Photoshop because blemishes are now a thing of the past! I do want to mention one thing before we jump into this tutorial and you go all gung-ho and wipe every tiny mark off your child’s face with these amazing tools that I’m going to show you. First of all, keep it real. Differentiate between actual blemishes and your subject’s normal skin appearance.
Here is an example of what I mean. One of my close friends has a daughter that developed a hemangioma on her forehead shortly after she was born. They got professional family portraits done while on vacation, and were very disappointed to find that the photographer photoshopped the hemangioma out. To them it was a part of who their daughter was and to say that it was a “blemish” was offensive to them. So, before you edit something, think twice, especially if it is for someone else. You certainly don’t want to offend them. To edit something out without asking is as good as saying, “this part of you is ugly.”
Today we will be focusing on TWO (2) Photoshop tools you can use to edit out a blemishes:
1) the Spot Healing brush OR 2) the Clone Stamp Tool.
I will be using Sophie as our subject. We will be taking a small spot on her forehead and cleaning it up and smoothing it out… but believe me this works like a charm from anything like a blemish to jelly on a child’s face that didn’t quite get cleaned off after lunch. LOL!

Using the Spot Healing Brush
Step One – Select the Tool
1. Zoom in Close up to the Photo
2. Select the Spot Healing Brush and chose a brush size.
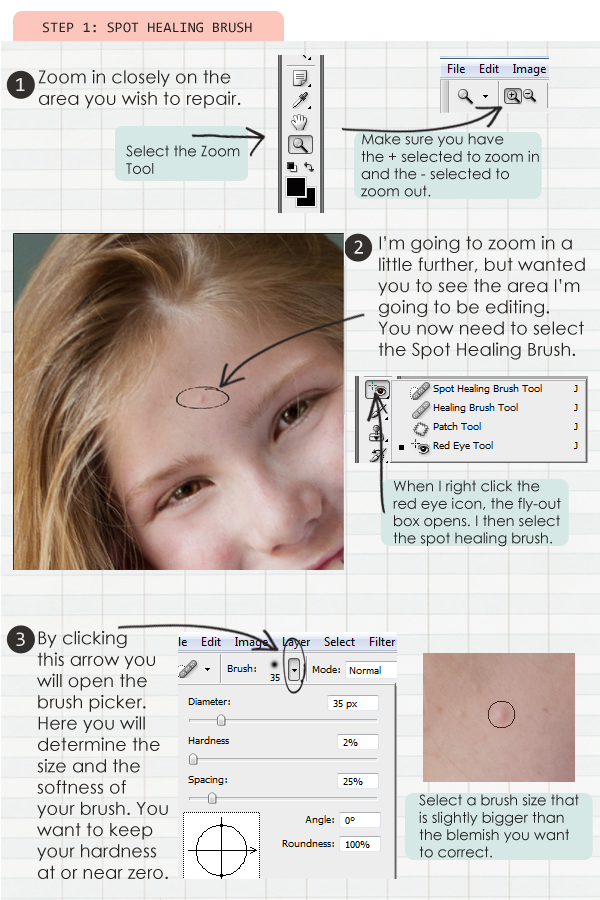
Step One – Cleaning Up the Spot. Let the Magic Begin!
1. Select Proximity Match
2. Click on the Spot to Clean Up.
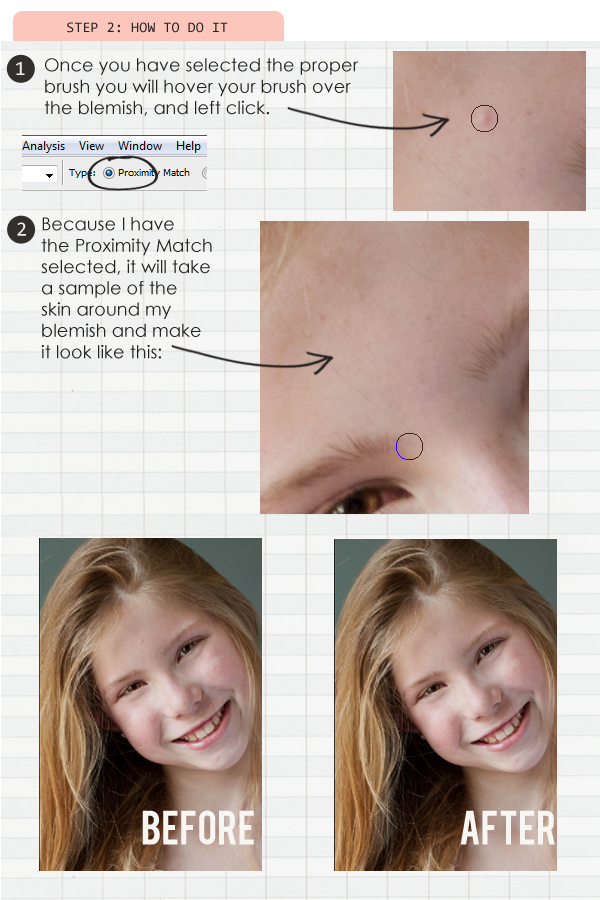
It really doesn’t get much simpler than that, does it?

Well, what if the skin doesn’t have a good, clean selection in the proximity of the blemish? This is where the clone stamp tool comes in. With the clone stamp tool, you choose what portion of the skin you want to select. Of course, you want to select an area that is similar in tone and color so the replacement doesn’t look unnatural. Here is how to edit with this tool.
Using the Clone Stamp Tool
Step One – Clone Stamp Tool!
1. Select the Clone Stamp Tool
2. Find a similar spot to “Clone”, hit Alt + Click to select.
3. Go back to the blemish and click on the Spot to Clean Up.
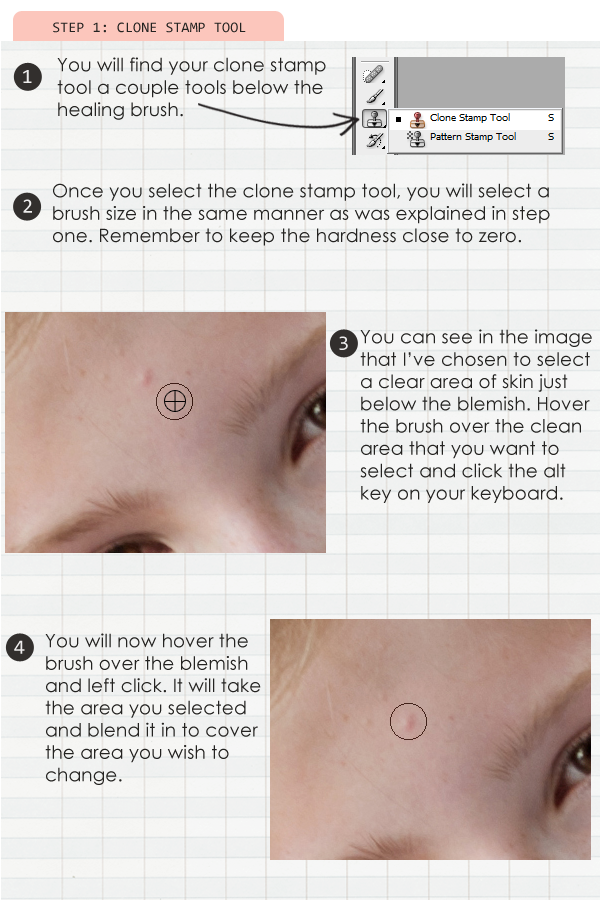
The possibilities with the clone stamp tool are endless really. I have edited out entire people from my photo with this amazing tool. But if you are just starting out and learning how to use it, you can practice on some simple blemishes.

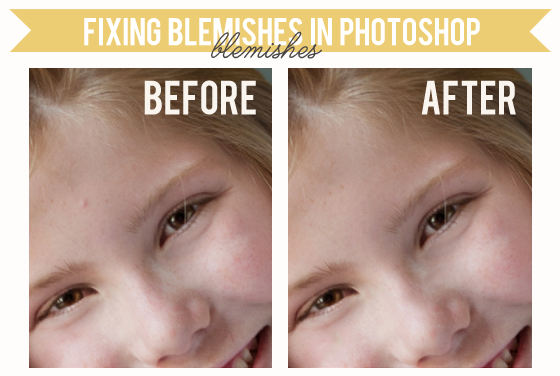
Here is a before and after using these techniques.
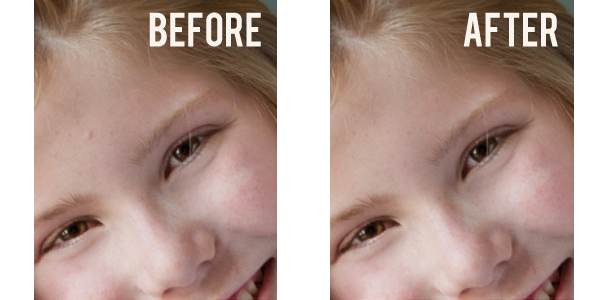
As always, I hope this tutorial has been a help to you.
Feel free to ask any questions in the comment section of this post and I’d be more than happy to help!

August 30, 2012 at 11:12 am
Linda Record says:
Very helpful. It’s the tiny details that make the difference, and this is a wonderful, simple way to enhance a photograph. Thank you. lr
August 30, 2012 at 11:32 am
Lor says:
Great tutorial; Thank you! I luv my cloning tool!!! 🙂
September 15, 2013 at 8:58 am
Jessica says:
Thanks for this great tutorial!! What version of Photoshop are you using? I just ordered Elements and am wondering if I can do this in that program. Thanks!
September 18, 2013 at 4:29 pm
Krista says:
Hi Jessica, I use Photoshop CS5… I’m not exactly sure if Elements has it, but I know it has a lot of the same tools. Just look for the Spot Healing Brush in your program. Good luck!!
January 22, 2014 at 1:24 pm
Jennifer says:
I use PSE and have looked at a few of your tutorials for help. So far I have been able to figure out how to do it in elements based on your instructions. This is the only one that hasn’t worked so far. I have a spot healing tool and your directions all make sense I just can’t get it to remove the blemish. Don’t know why. But I appreciate your tutorials. They have been super helpful. Thank you.
Jenn
January 25, 2014 at 1:07 pm
Krista says:
Hi Jenn,
I personally do not have PSE, but here are a couple tips from a couple of my CT members:
From my2monkeys (PSE12)
PSE only has two healing tools… an “spot healing brush” which is where the proximity match is as well as create texture and content aware. This tool works without selecting an area to match, the program auto selects for the tool. To use, pick the size brush needed and click over the area you want corrected. It’s done.
The other tool is the “Healing Brush” gives you more options. With this option you also select your own area to match. Select your size brush, where you want the area corrected aligned with the match area; as well as the source (pattern or sampled) the mode (normal, replace | multiply, screen, darken, lighten | color, luminosity) and cloning options. To work, select brush size and alignment, mode, source etc. Then alt+left click on match area and right click on blemish to correct the area.
From pusticks (PSE12)
I use PSE11 and I’ve used the spot heal for small blemishes. I just select the tool, size and check the box for proximity match and most of the time it does fine. There isn’t an extra pop out menu in mine for picking the type of brush, softness etc (at least that I’ve been able to find). I don’t use clone much for blemishes but using the “clone from source” option works for just the same way it does in your post… This might sound silly, but make sure you on the correct layer!!
Hope this helps!! XOXO