Tutorial | Making the Eyes in Your Photos POP
Posted on under Photo Editing Tutorials, TUTORIALS
Eyes are most definitely “windows into your soul”. So I think it’s important to spend a little time on your subjects eyes in your photo editing process. Doing this can really brighten up your photo and can capture that “window to the soul” look in your photo. Plus, it only takes a few simple steps! In this tutorial, I will explain how to use Adobe Photoshop to make the eyes in your photos “pop,” with whiter whites and brighter colors. Take a look at these simple editing techniques can make the eyes in your photos pop!
This technique works best on photos where your subject has catch lights. What are catch lights? Catch Light is a term used when you see where the light source has reflected off in the surface of the eye. While you can still edit any photograph… having a photo with ‘catch lights’ can give so much depth and dimension to the eye, and give ‘life’ to the photograph.
Editing Eyes in Photoshop
This tutorial is using Photoshop CS5, but Element users may have similar tricks.
Keep in mind to keep the adjustments subtle so that the eyes don’t look fake.
Step One: Duplicate the Eyes
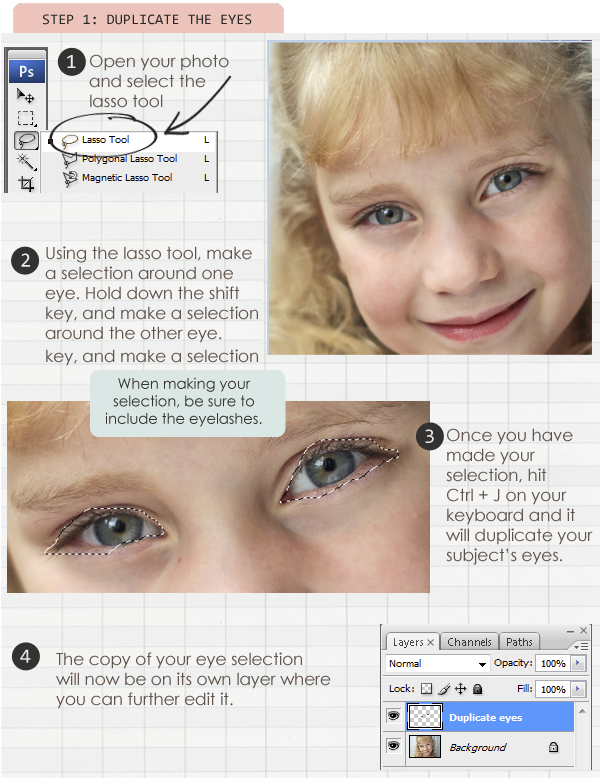
1. Open your photo and select your lasso tool
2. Draw a selection around one eye, including the entire eye and lashes.
Hold down the shift key and draw a selection around the other eye.
3. Hit Ctrl + J (to copy) on your keyboard to duplicate your selection.
Step Two: Add a Filter
This is going to brighten, POP, and sharpen your eyes.
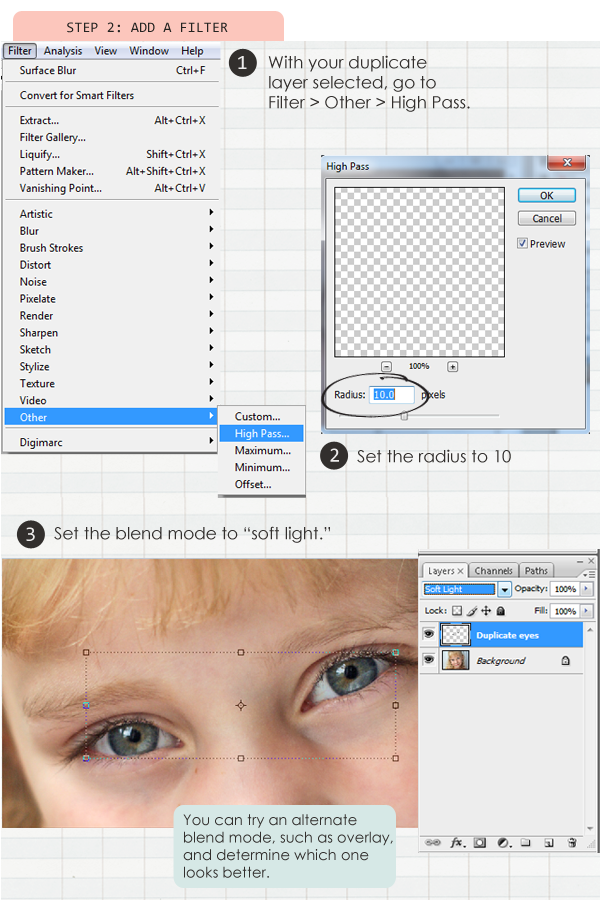
1. With your duplicate layer selected, go to Filter > Other > High Pass
2. Set the radius to 10
3. Set the blend mode to “Soft Light” or “Overlay.”
Step Three: Using the Dodge Tool
Now we are going to lighten the ‘whites’ and catchlights in our photo.
1. With our “Duplicate Eye” layer selected, Select the Dodge Tool
2. With your dodge tool, brush over the whites of the eyes and the catch lights in the eye
3. Sometimes (not always) I quickly brush over the iris of the eye as well

Step Four: Using the Sponge Tool
Let’s Pump up the Color in the Eye.
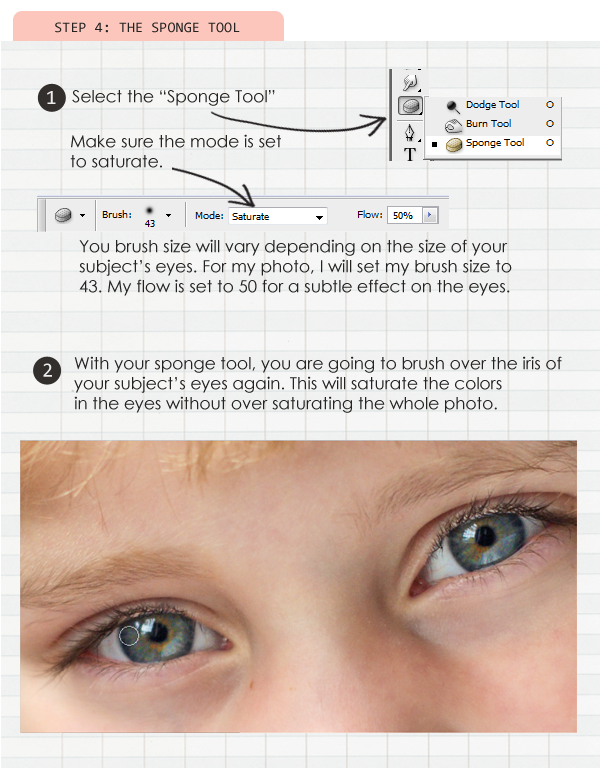
1. Select the Sponge Tool
2. Make sure the sponge tool is set to “saturate”
3. Brush over the iris of your subject’s eyes to saturate the color.
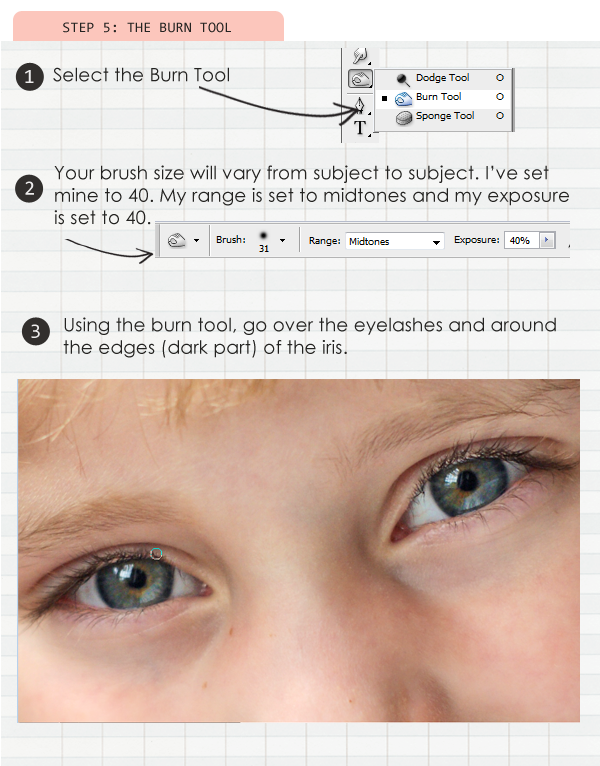
Finally, we are going to darken the lashes and the rim of the iris with the burn tool.
Step Five: Using the Burn Tool
1. Select the Burn Tool
2. Go over the dark rim around the iris as well as the lashes with your brush.
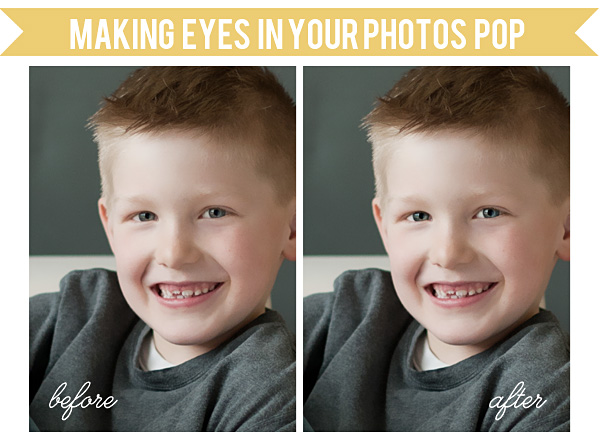
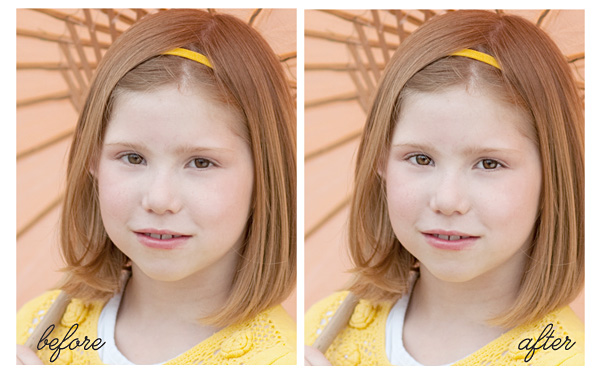
After we have followed all of those steps, here is our final comparison:

More Before and Afters
The results are subtle, and that is what you want. KEEP IT NATURAL!! Be sure to highlight the eyes, while at the same time keeping them natural in appearance. If you overdo it on the eyes, they will look processed and fake.

September 19, 2012 at 12:46 pm
Margaret says:
Great tutorial!
So easy to understand with all the steps clearly defined. Thanks!
September 19, 2012 at 12:52 pm
Margaret says:
An after thought…..do you by chance have a tutorial on blending a face into a background so there is no line on where the face photo meets the background?
Opacity adjustment will sometimes work…but rarely. It would be nice to keep some of the face sharpness.
Any tutorials, tips, links would be appreciated by anyone reading this as well.
Have a nice day!
September 28, 2012 at 10:41 am
Laurie says:
Margaret,
The best way that I have found to do this, is to use a very soft brush and erase away the sharp line of the photo edge. Works everytime for me. Depending on the look I want somtimes I’ll use other types of brushes, such as a dry media brush, etc. Otherwise a typical round, but soft, brush will do the trick!
February 24, 2013 at 7:07 pm
Margaret says:
Oh dear……I am so late in adding a thank you.
THANKS SO MUCH!!! I will try this out.
September 19, 2012 at 1:02 pm
Jenifer J says:
This is an awesome tutorial! Thanks so much for sharing this information. 🙂 Can’t wait to try it out!!
September 19, 2012 at 2:03 pm
Nunu says:
Awesome! Thanks a lot for your kind heart to share this tutorial. I can’t wait to try it to my kids photo.
September 19, 2012 at 4:12 pm
Helen says:
amazing tut! thanks for sharing!!!
September 20, 2012 at 10:55 am
Jan says:
Great tutorial! Thanks
September 20, 2012 at 12:37 pm
Michael says:
Thanks! It really does work and is subtle. Also, I did it in PSE and it works the same way as your steps show!
September 21, 2012 at 10:51 am
Leticia says:
Oh my! What kind of sorcery is this?! haha It’s like magic. I just try with one of my little girl pic, and works fantastic! Thank you so much!
February 24, 2013 at 6:49 pm
lacy says:
Any suggestions for Lightroom?
February 25, 2013 at 8:53 pm
Krista says:
Hi Lacy, I’m not sure… I don’t use Lightroom at this time. Sorry!
August 1, 2013 at 10:03 pm
Norinda says:
Thanks again! You have the best Photoshop tutorials
August 7, 2013 at 7:50 am
Krista says:
I’m so glad the help you learn a little something! thanks for stopping by!
January 17, 2014 at 4:23 pm
Andrea says:
love this tutorial, thanks so much!
January 18, 2014 at 3:53 pm
Mary says:
terrific tutorial…i’m just learning to edit photos in pse and this was wonderful with all your screen prints and easy to follow tutorials. thank you for taking the time to do this for us~
January 20, 2014 at 1:41 pm
Krista says:
I’m so glad to have helped Mary!! You are on your way to some great photos!!