Tutorial | Shadowing Acrylic Elements
Posted on under Scrapbooking Tutorials, TUTORIALS
I absolutely love acrylic elements. However, I used to shy away from using them mainly because I felt they looked so unrealistic once I shadowed them. All I’d get when I applied a drop shadow was this dark gray blob for an element. Not pretty.
Then I developed a shadowing technique that brought my acrylics back to life again.
If you are in the same boat I once was regarding acrylics, then this tutorial is for you. Today I’m going to show you an easy way to apply a shadow to your acrylic element, while still maintaining the transparent look that we love about them!

Sample Acrylic Products


Shadowing Acrylic Elements
Step One:
1. Open an acrylic element onto your background paper.
2. Add a drop shadow to your element
I used the settings – Linear Burn / Opacity 44 / Distance 14 / Size 29
3. Put your shadow on its own layer
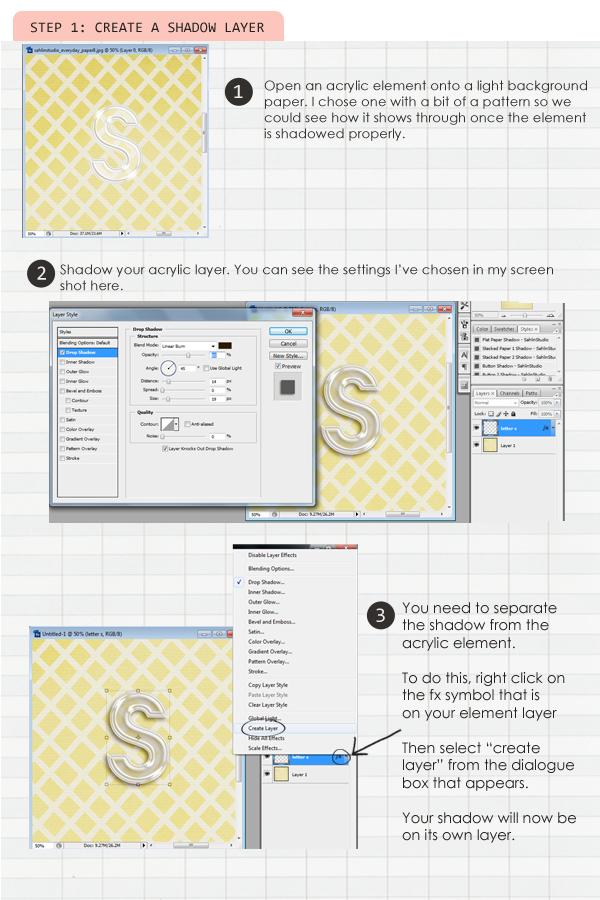
You can see in the image above that once I added a drop shadow, my element turned an ugly dark gray. Here are the steps to repair that problem.
Step two:
1. Making sure your acrylic element is selected in your layers palette, use your magic wand tool to select the element. Marching ants will appear around your element.
2. In your layer’s palette, select the shadow layer
3. Hover your mouse over the element on your layout, right click and select “layer via cut.”
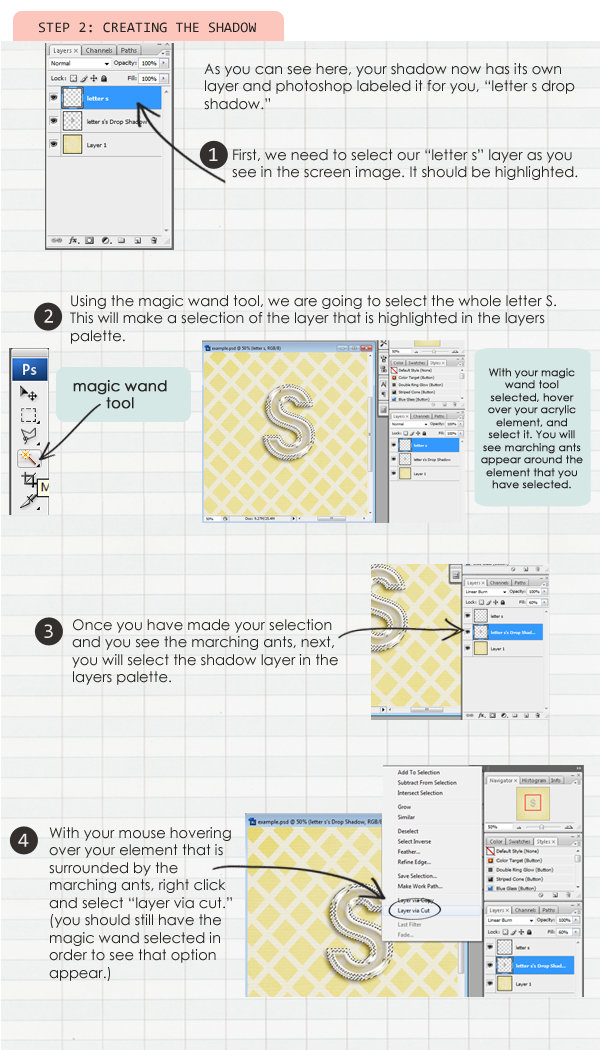
The drop shadow is now divided into two layers – the part that is directly under your element, and the part that peeks out and what you see on the outside of your element (the part that gives it the depth that you see).
The next steps are going to soften that shadow, while still keeping the appearance of depth.
Step Three:
1. Rename your new shadow layers to outside and inside shadows
2. Adjust the opacity of your inside shadow layer
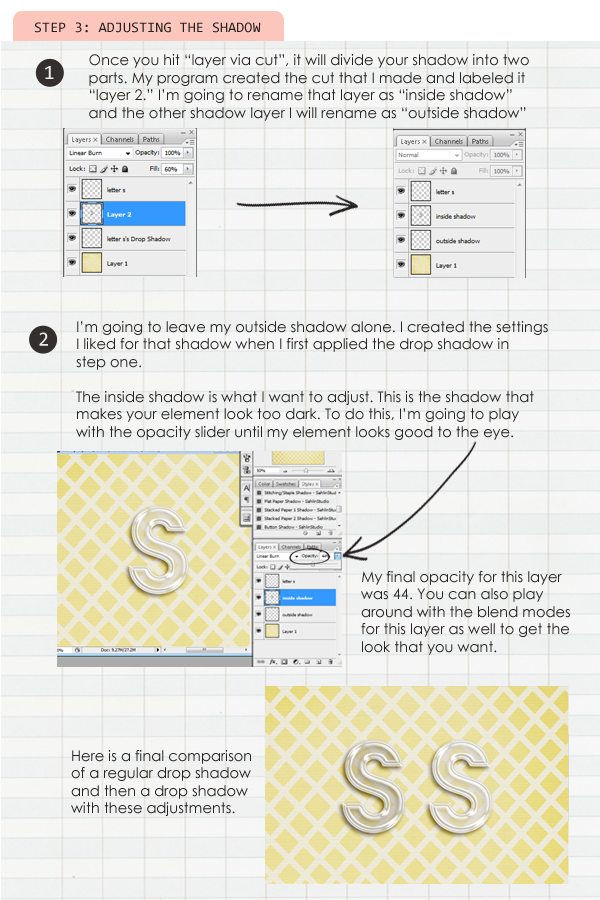
You might wonder, “Why not just delete the inside shadow all together?” The reason I don’t do this, is because in reality, the acrylic element is still going to give a slight shadow on the inside. So, in order to keep it realistic, I keep a very light shadow. Everyone will have a different opinion on the opacity level and possibly even the blend mode, should you choose to change that. As with most of the tutorials, the key is to play around with it until it looks good to YOU.

July 30, 2012 at 2:41 pm
magaly says:
i am trying to read your settings but the numbers are to tine to read even with my glasses on can you write them for me or post this on your fb page i will appreciate it thank you your designs are the best.
July 30, 2012 at 3:13 pm
Krista says:
I’m so sorry sweetie. Yes, those are really small aren’t they? The setting I used are: Linear Burn / Opacity 44, Distance 14 / Size 29 I updated the thread with this info too! Glad this could help you!
July 30, 2012 at 6:05 pm
Kim says:
Thanks for this great tutorial Krista. I’ve always struggled with shadowing acrylic elements. I came up with a system that’s similar to this but it’s not nearly as effective. Thanks for showing me a better way to do it! It’s amazing that I’ve been using Photoshop for years and never knew about the layer via cut.
July 30, 2012 at 7:56 pm
Krista says:
YAY!! I’m so glad you like this way. It’s always so exciting when you learn something new! It brings me happiness to share.
August 1, 2012 at 7:00 pm
Cristina says:
Very cool tut! I never did it this way but I’ll definitely try it! It looks better than the method I use!
August 3, 2012 at 12:50 pm
Tracy says:
This is a great tut thanks.
August 3, 2012 at 1:08 pm
Kellie Salmon says:
Wow!! Have you made my shadowing life easier!! You have no clue how badly I have wanted to use those clear acrylic elements and just like you described I have shied away from them because I could never get them to look right once they were shadowed! I was so excited I shared your tutorial link on my blog as well so my followers can benefit from your sheer genius! Thank you so much..Now off to create something with a TON of clear acrylic on it!!!!
August 6, 2012 at 8:35 am
Krista says:
I am SO glad you loved the tutorial!! And it’s so simple, yes?? I’d LOVE to see your acrylic-ed layout!!! You go girl!! Thanks for your sweet words.
August 3, 2012 at 1:27 pm
Jenn says:
That was great, thanks! Can’t wait to give it a try!
August 3, 2012 at 2:43 pm
Jennifer B. says:
Thank you so much! It looks great!
August 3, 2012 at 10:07 pm
Sara S says:
I’m excited to try this, I tried using your Plastic Alpha and I was frustrated with my shadows so now I’ll be able to use it! Thanks!
August 4, 2012 at 8:08 am
Krista says:
YAY!! I’m so glad I was thinking on your wave length! This way TOTALLY ROCKS! Good luck!
December 1, 2013 at 6:11 pm
The Lilypad DYD: Confetti Pockets » The Lilypad says:
[…] to the pocket. To achieve a realistic shadow for my clear or acrylic digital pieces I use a shadow tutorial by our own Krista Sahlin. […]